


Integrate .NET Aspire with ASP.NET Zero
.NET Aspire is a cloud-native application stack designed to simplify the development of distributed systems in .NET. It is getting popular among .NET developers and we wanted to try it with ASP.NET Zero's MVC UI.
Let's get started and integrate .NET Aspire with ASP.NET Zero.
Create Project
First, login to your account on https://aspnetzero.com go to https://aspnetzero.com/download and create your project. While creating your project, select ASP.NET CORE MVC & jQuery as the project type.
After creating your project, follow Getting Started document and be sure that your project runs successfully.
Integrate .NET Aspire
We will store our Aspire applicaiton under aspire folder. To do this, create a folder named aspire in the same level of src folder in your project.
After that, run the following command to create .NET Aspire App Host application.
dotnet new aspire-apphost -o ZeroAspireSample.AppHost
You can also create a service defaults project but, we will not use it in this sample to keep it simple.
Add Reference to ASP.NET Zero Apps
We will run following applications using .NET Aspire, so we need to add a project reference for these projects to our .NET Aspire App Host prohect;
- MVC UI
- API Host
- Public Website
- Migrator Project
We want to basically run SQL Server with Docker using .NET Aspire. Run migrations on this database using Migrator project. And, finally we will run 3 Web UIs provided by ASP.NET Zero out of the box.
SQL Server
Before getting started, bu sure that you are running Docker on your PC. Also, if you don't have SQL Server Docker image, it might take some time to download and start it.
Go to AppHost.cs file and add the code below. This will run SQL Server on the Docker and will create a database named ZeroAspireSampleDb.
Since the SQL Server container is slow to start, we are using ContainerLifetime.Persistent to avoid restarts and this slowness for the future runs.
var builder = DistributedApplication.CreateBuilder(args);

// SQL Server
var sql = builder.AddSqlServer("ZeroAspireSample-SQL")
    .WithLifetime(ContainerLifetime.Persistent);

// Database
var db = sql.AddDatabase("ZeroAspireSampleDb");
Database Migration
If we run our .NET Aspire application, we will have a running SQL Server database. Let's run migrations on this database using .NET Aspire.
To do this, add lines below to your AppHost.cs file;
// Migrator Project
var migrator = builder.AddProject<ZeroAspireSample_Migrator>("Migrator")
    .WithEnvironment("ASPNETCORE_Docker_Enabled", "true")
    .WithReference(db, connectionName: "Default")
    .WaitFor(db);
Here, we have a few special configurations.
The first one is, we are setting ASPNETCORE_Docker_Enabled environment variable so ASP.NET Zero's Migrator applicationm will not wait for any user input and will exit immediately when it finishes its job.
The second one is, we are setting connectionName when referencing the database to our Migrator application. Otherwise, .NET Aspire will use ConnectionStrings__ZeroAspireSampleDb and becasue of that, our Migrator app will not be able to use SQL Server running on .NET Aspire.
Since we are also using WaitFor, .NET Aspire will not run our Migrator application until the database is up and ready.
Web UIs
We can now run our 3 web projects in order. To do that, add the code block below to your AppHost.cs file.
// Admin UI Project
builder.AddProject<ZeroAspireSample_Web_Mvc>("Admin-UI", launchProfileName: "ZeroAspireSample.Web")
    .WithHttpHealthCheck("/health")
    .WithReference(db, connectionName: "Default")
    .WaitFor(migrator);

// API Host Project
builder.AddProject<Projects.ZeroAspireSample_Web_Host>("API-Host", launchProfileName: "ZeroAspireSample.Web.Host")
    .WithReference(db, connectionName: "Default")
    .WithHttpHealthCheck("/health");

// Public UI Project
builder.AddProject<Projects.ZeroAspireSample_Web_Public>("Public-UI", launchProfileName: "ZeroAspireSample.Web.FrontEnd")
    .WithReference(db, connectionName: "Default")
    .WithHttpHealthCheck("/health");
Let's check details here so we can understand how .NET Aspire runs our web applications.
We are using launchProfileName when running all 3 projects. Otherwise, .NET Aspire will run these projects using the default port 5000. However, if we provide launchProfileName, .NET Aspire will use the given profile to run our web application. This way, our apps will run on the ports we want them to run.
We also have WithHttpHealthCheck so that .NET Aspire can understand if our application is running and healty. By default, health checks are disabled in ASP.NET Zero projects, so you need to enable it by going to appsettings.json file and setting HealthChecksEnabled to true.
We also reference the database we created previously for all 3 web applications.
Here is the final version of AppHost.cs file.
using Projects;

var builder = DistributedApplication.CreateBuilder(args);

// SQL Server
var sql = builder.AddSqlServer("ZeroAspireSample-SQL")
    .WithLifetime(ContainerLifetime.Persistent);

// Database
var db = sql.AddDatabase("ZeroAspireSampleDb");

// Migrator Project
var migrator = builder.AddProject<ZeroAspireSample_Migrator>("Migrator")
    .WithEnvironment("ASPNETCORE_Docker_Enabled", "true")
    .WithReference(db, connectionName: "Default")
    .WaitFor(db);

// Admin UI Project
builder.AddProject<ZeroAspireSample_Web_Mvc>("Admin-UI", launchProfileName: "ZeroAspireSample.Web")
    .WithHttpHealthCheck("/health")
    .WithReference(db, connectionName: "Default")
    .WaitFor(migrator);

// API Host Project
builder.AddProject<Projects.ZeroAspireSample_Web_Host>("API-Host", launchProfileName: "ZeroAspireSample.Web.Host")
    .WithReference(db, connectionName: "Default")
    .WithHttpHealthCheck("/health");

// Public UI Project
builder.AddProject<Projects.ZeroAspireSample_Web_Public>("Public-UI", launchProfileName: "ZeroAspireSample.Web.FrontEnd")
    .WithReference(db, connectionName: "Default")
    .WithHttpHealthCheck("/health");

builder.Build().Run();
.NET Aspire Dashboard
Login to Dashboard
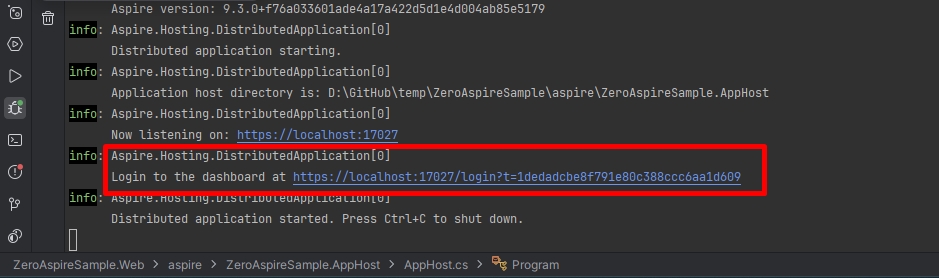
For the first run, .NET Aspire will ask you to login to Dashboard. You will need a token to login. You can find this token in the logs when you run the AppHost project as shown below;
View Dashboard
After making all these changes, if we run the ZeroAspireSample.AppHost project, we will see a dashboard similar to the one below;

.NET Aspire will run the SQL Server, will migrate the database by running the Migrator project and then will run the web projects. Finally, you should see a dashboard like this;


