Using ASP.NET Zero with DevExtreme Angular Part 3
Welcome to Part 3 of the tutorial series on using ASP.NET Zero with DevExtreme Angular. In this tutorial, we will focus on creating a new person in the phone book application by adding a modal for adding a new item, and deleting an item from the phone book.
Adding a CreatePerson Method to PersonAppService
We will start by defining a CreatePerson method in the IPersonAppService interface. The method will have the following signature:
Task CreatePerson(CreatePersonInput input);
To support this method, we need to create a corresponding DTO (Data Transfer Object) named CreatePersonInput, which will define the parameters for the method. Here is the definition of the CreatePersonInput class:
public class CreatePersonInput
{
    [Required]
    [MaxLength(PersonConsts.MaxNameLength)]
    public string Name { get; set; }

    [Required]
    [MaxLength(PersonConsts.MaxSurnameLength)]
    public string Surname { get; set; }

    [EmailAddress]
    [MaxLength(PersonConsts.MaxEmailAddressLength)]
    public string EmailAddress { get; set; }
}
We also need to add configuration for AutoMapper in the CustomDtoMapper.cs file to map CreatePersonInput to the Person entity. Additionally, we can remove the corresponding consts from the Person entity and define a new PersonConsts class in the .Core.Shared project to hold the max length constants.
configuration.CreateMap<CreatePersonInput, Person>();
CreatePersonInput is mapped to Person entity (comment out related line in CustomDtoMapper.cs and we will use mapping below). All properties are decorated with data annotation attributes to provide automatic validation. Notice that we use same consts defined in PersonConsts.cs in .Core.Shared project for MaxLength properties. After adding this class, you can remove consts from Person entity and use this new consts class.
public class PersonConsts
{
    public const int MaxNameLength = 32;
    public const int MaxSurnameLength = 32;
    public const int MaxEmailAddressLength = 255;
}
The implementation of the CreatePerson method in the PersonAppService is straightforward. It involves mapping the input to the Person entity and inserting it into the database using the repository. The method uses the async/await pattern, as recommended in ASP.NET Zero.
public async Task CreatePerson(CreatePersonInput input)
{
    var person = ObjectMapper.Map<Person>(input);
    await _personRepository.InsertAsync(person);
}
Testing CreatePerson Method
To ensure the correctness of the CreatePerson method, we can write unit tests. We will create two test methods: one to test the successful creation of a person with valid arguments, and another to test the failure of creating a person with invalid arguments. The tests will utilize the async/await pattern and make use of the UsingDbContext helper method provided by the AppTestBase class to perform database operations.
[Fact]
public async Task Should_Create_Person_With_Valid_Arguments()
{
    //Act
    await _personAppService.CreatePerson(
        new CreatePersonInput
        {
            Name = "John",
            Surname = "Nash",
            EmailAddress = "[email protected]"
        });

    //Assert
    UsingDbContext(
        context =>
        {
            var john = context.Persons.FirstOrDefault(p => p.EmailAddress == "[email protected]");
            john.ShouldNotBe(null);
            john.Name.ShouldBe("John");
        });
}
Test method also written using async/await pattern since calling method is async. We called CreatePerson method, then checked if given person is in the database. UsingDbContext method is a helper method of AppTestBase class (which we inherited this unit test class from). It's used to easily get a reference to DbContext and use it directly to perform database operations. This method successfully works since all required fields are supplied. Let's try to create a test for invalid arguments:
[Fact]
public async Task Should_Not_Create_Person_With_Invalid_Arguments()
{
    //Act and Assert
    await Assert.ThrowsAsync<AbpValidationException>(
        async () =>
                {
                    await _personAppService.CreatePerson(
                        new CreatePersonInput
                        {
                            Name = "John"
                        });
                });
}
We did not set Surname property of CreatePersonInput despite it being required. So, it throws AbpValidationException automatically. Also, we can not send null to CreatePerson method since validation system also checks it. This test calls CreatePerson with invalid arguments and asserts that it throws AbpValidationException. See validation document for more information.
Adding Create New Person To Index
First of all, we should use nswag/refresh.bat to re-generate service-proxies. This will generate the code that is needed to call PersonAppService.CreatePerson method from client side. Notice that you should rebuild & run the server side application before re-generating the proxy scripts.
Go to phonebook.component.ts and add insert option to CustomStore
import {Component, Injector} from '@angular/core';
import {AppComponentBase} from '@shared/common/app-component-base';
import {appModuleAnimation} from '@shared/animations/routerTransition';
import {PersonServiceProxy} from "@shared/service-proxies/service-proxies";
import CustomStore from "@node_modules/devextreme/data/custom_store";

@Component({
    templateUrl: './phonebook.component.html',
    animations: [appModuleAnimation()]
})

export class PhoneBookComponent extends AppComponentBase {
    dataSource: any;
    refreshMode: string;

    constructor(
        injector: Injector,
        private _personService: PersonServiceProxy
    ) {
        super(injector);
        this.init();
    }

    init() {
        this.refreshMode = "full";

        this.dataSource = new CustomStore({
            key: "id",
            load: (loadOptions) => {
                return this._personService.getPeople("").toPromise();
            },
            insert: (values) => {
                return this._personService.createPerson(values).toPromise()
            }
        });
    }
}
Go to phonebook.component.html and add dxo-editing tag with allowAdding true option:
<div [@routerTransition]>
    <div class="content d-flex flex-column flex-column-fluid">
        <sub-header [title]="'PhoneBook' | localize">
        </sub-header>

        <div [class]="containerClass">
            <div class="card card-custom">
                <div class="card-body">
                    <dx-data-grid
                        id="phonebookgrid"
                        [dataSource]="dataSource"
                        [repaintChangesOnly]="true"
                        [showBorders]="true">

                        <dxo-scrolling mode="virtual"></dxo-scrolling>
                        <dxo-editing
                            mode="row"
                            [refreshMode]="refreshMode"
                            [allowAdding]="true">
                        </dxo-editing>

                        <dxi-column dataField="name" caption="{{'Name' | localize}}"></dxi-column>
                        <dxi-column dataField="surname" caption="{{'Surname' | localize}}"></dxi-column>
                        <dxi-column dataField="emailAddress" caption="{{'EmailAddress' | localize}}"></dxi-column>
                    </dx-data-grid>
                </div>
            </div>
        </div>
    </div>
</div>
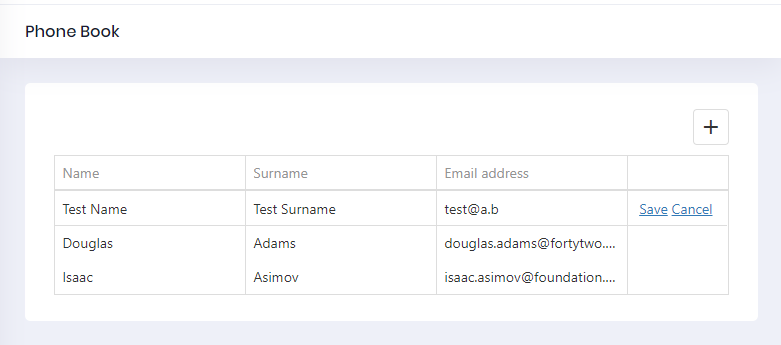
The result:
Deleting a Person
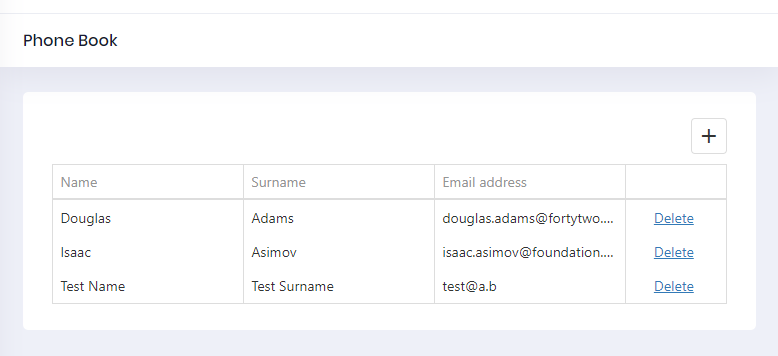
To enable deleting a person, we add a DeletePerson method to the server-side IPersonAppService interface. The method takes an EntityDto as input, which is a shortcut provided by ASP.NET Zero for passing an ID value. The implementation of the method is straightforward, as it uses the repository to delete the person asynchronously.
Application Service
Let's add a DeletePerson method to the server side. We are adding it to the interface IPersonAppService,
Task DeletePerson(EntityDto input);
PersonAppService.cs
public async Task DeletePerson(EntityDto input)
{
    await _personRepository.DeleteAsync(input.Id);
}
Service Proxy Generation
Since we made changes to the server-side services, we need to regenerate the client-side service proxies using NSwag. This step ensures that the updated service methods are available on the client-side.
Component Script
Go to phonebook.component.ts and add delete option to CustomStore:
import {Component, Injector} from '@angular/core';
import {AppComponentBase} from '@shared/common/app-component-base';
import {appModuleAnimation} from '@shared/animations/routerTransition';
import {EditPersonInput, PersonServiceProxy} from "@shared/service-proxies/service-proxies";
import CustomStore from "@node_modules/devextreme/data/custom_store";

@Component({
    templateUrl: './phonebook.component.html',
    animations: [appModuleAnimation()]
})

export class PhoneBookComponent extends AppComponentBase {

    dataSource: any;
    refreshMode: string;

    constructor(
        injector: Injector,
        private _personService: PersonServiceProxy
    ) {
        super(injector);
        this.init();
    }

    init() {
        this.refreshMode = "full";

        this.dataSource = new CustomStore({
            key: "id",
            load: (loadOptions) => {
                return this._personService.getPeople("").toPromise();
            },
            insert: (values) => {
                return this._personService.createPerson(values).toPromise()
            },
            remove: (key) => {
                return this._personService.deletePerson(key).toPromise();
            }
        });
    }
}
Go to phonebook.component.html and add dxo-editing tag with allowDeleting true option:
<div [@routerTransition]>
    <div class="content d-flex flex-column flex-column-fluid">
        <sub-header [title]="'PhoneBook' | localize">
        </sub-header>

        <div [class]="containerClass">
            <div class="card card-custom">
                <div class="card-body">
                    <dx-data-grid
                        id="phonebookgrid"
                        [dataSource]="dataSource"
                        [repaintChangesOnly]="true"
                        [showBorders]="true">

                        <dxo-scrolling mode="virtual"></dxo-scrolling>
                        <dxo-editing
                            mode="row"
                            [refreshMode]="refreshMode"
                            [allowAdding]="true"
                            [allowDeleting]="true">
                        </dxo-editing>

                        <dxi-column dataField="name" caption="{{'Name' | localize}}"></dxi-column>
                        <dxi-column dataField="surname" caption="{{'Surname' | localize}}"></dxi-column>
                        <dxi-column dataField="emailAddress" caption="{{'EmailAddress' | localize}}"></dxi-column>
                    </dx-data-grid>
                </div>
            </div>
        </div>
    </div>
</div>
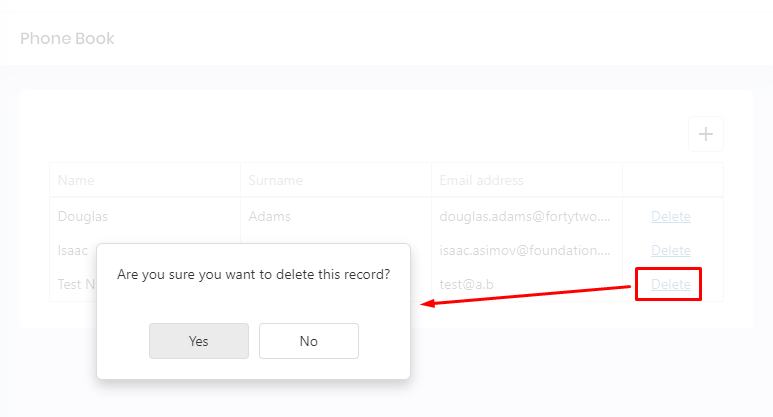
It first shows a confirmation message when we click the delete button:
Conclusion
In this blog post, we covered two important functionalities in the phone book application built with ASP.NET Zero and DevExtreme Angular: creating a new person and deleting a person.
Summary
- Creating a new person with ASP.NET Zero and DevExtreme Angular.
- Adding a
CreatePersonmethod to thePersonAppService. - Testing the
CreatePersonmethod with valid and invalid arguments. - Adding the ability to create a new person in the client-side application.
- Deleting a person from the phone book.
- Implementing the
DeletePersonmethod in thePersonAppService. - Updating the client-side service proxies and UI for deleting a person.
What's Next?
In the upcoming blog post, we will cover several important topics related to our application. We'll start by exploring the process of editing a person's information, allowing us to update their details as needed. Next, we'll focus on adding new phone numbers to a person, enhancing their contact information. We'll also learn how to delete phone numbers from a person's record, providing flexibility in managing their data. Additionally, we'll guide you through running the application, ensuring a smooth execution of the developed features. Finally, we'll conclude the blog series, summarizing our journey and achievements. Stay tuned for an informative and engaging read!
See the next part of this tutorial.
