Localization in ASP.NET Core
Localization is the process of adapting software to meet the language and cultural requirements of a particular target market. It involves translating text and adjusting other elements of a website or application to make it accessible and user-friendly for people from different regions and backgrounds.
In ASP.NET Core, localization is an essential feature that enables developers to create multilingual websites and applications. It provides a straightforward way to create and manage localized content, which can improve the user experience and make your application more accessible to a broader audience.
To download the source code for this article, you can visit our GitHub repository.
Getting Started with Localization in ASP.NET Core
To start, create an Asp.Net Core application. You can choose to use either Razor Pages or MVC based on your preference.
Configure Localization
Configure localization by adding the following code to either the Program.cs or Startup.cs file, as per your application structure, as shown in this Microsoft documentation:
This code configures the localization service in the application and specifies the default and supported cultures that will be used to localize the application's content.
The first section of the code sets up the path to the localization resources, which are typically stored in files such as .resx or .json files. The AddLocalization method is used to register the localization service with the dependency injection system.
builder.Services.AddLocalization(options =>
{
    options.ResourcesPath = "Resources";
});
The last section of the code configures the request localization options for the application. The DefaultRequestCulture property is set to the default culture, and the SupportedCultures and SupportedUICultures properties are set to the array of supported cultures.
const string defaultCulture = "en";

var supportedCultures = new[]
{
    new CultureInfo(defaultCulture),
    new CultureInfo("tr")
};

builder.Services.Configure<RequestLocalizationOptions>(options => {
    options.DefaultRequestCulture = new RequestCulture(defaultCulture);
    options.SupportedCultures = supportedCultures;
    options.SupportedUICultures = supportedCultures;
});
Add middleware to the request pipeline by adding the following code:
app.UseRequestLocalization();
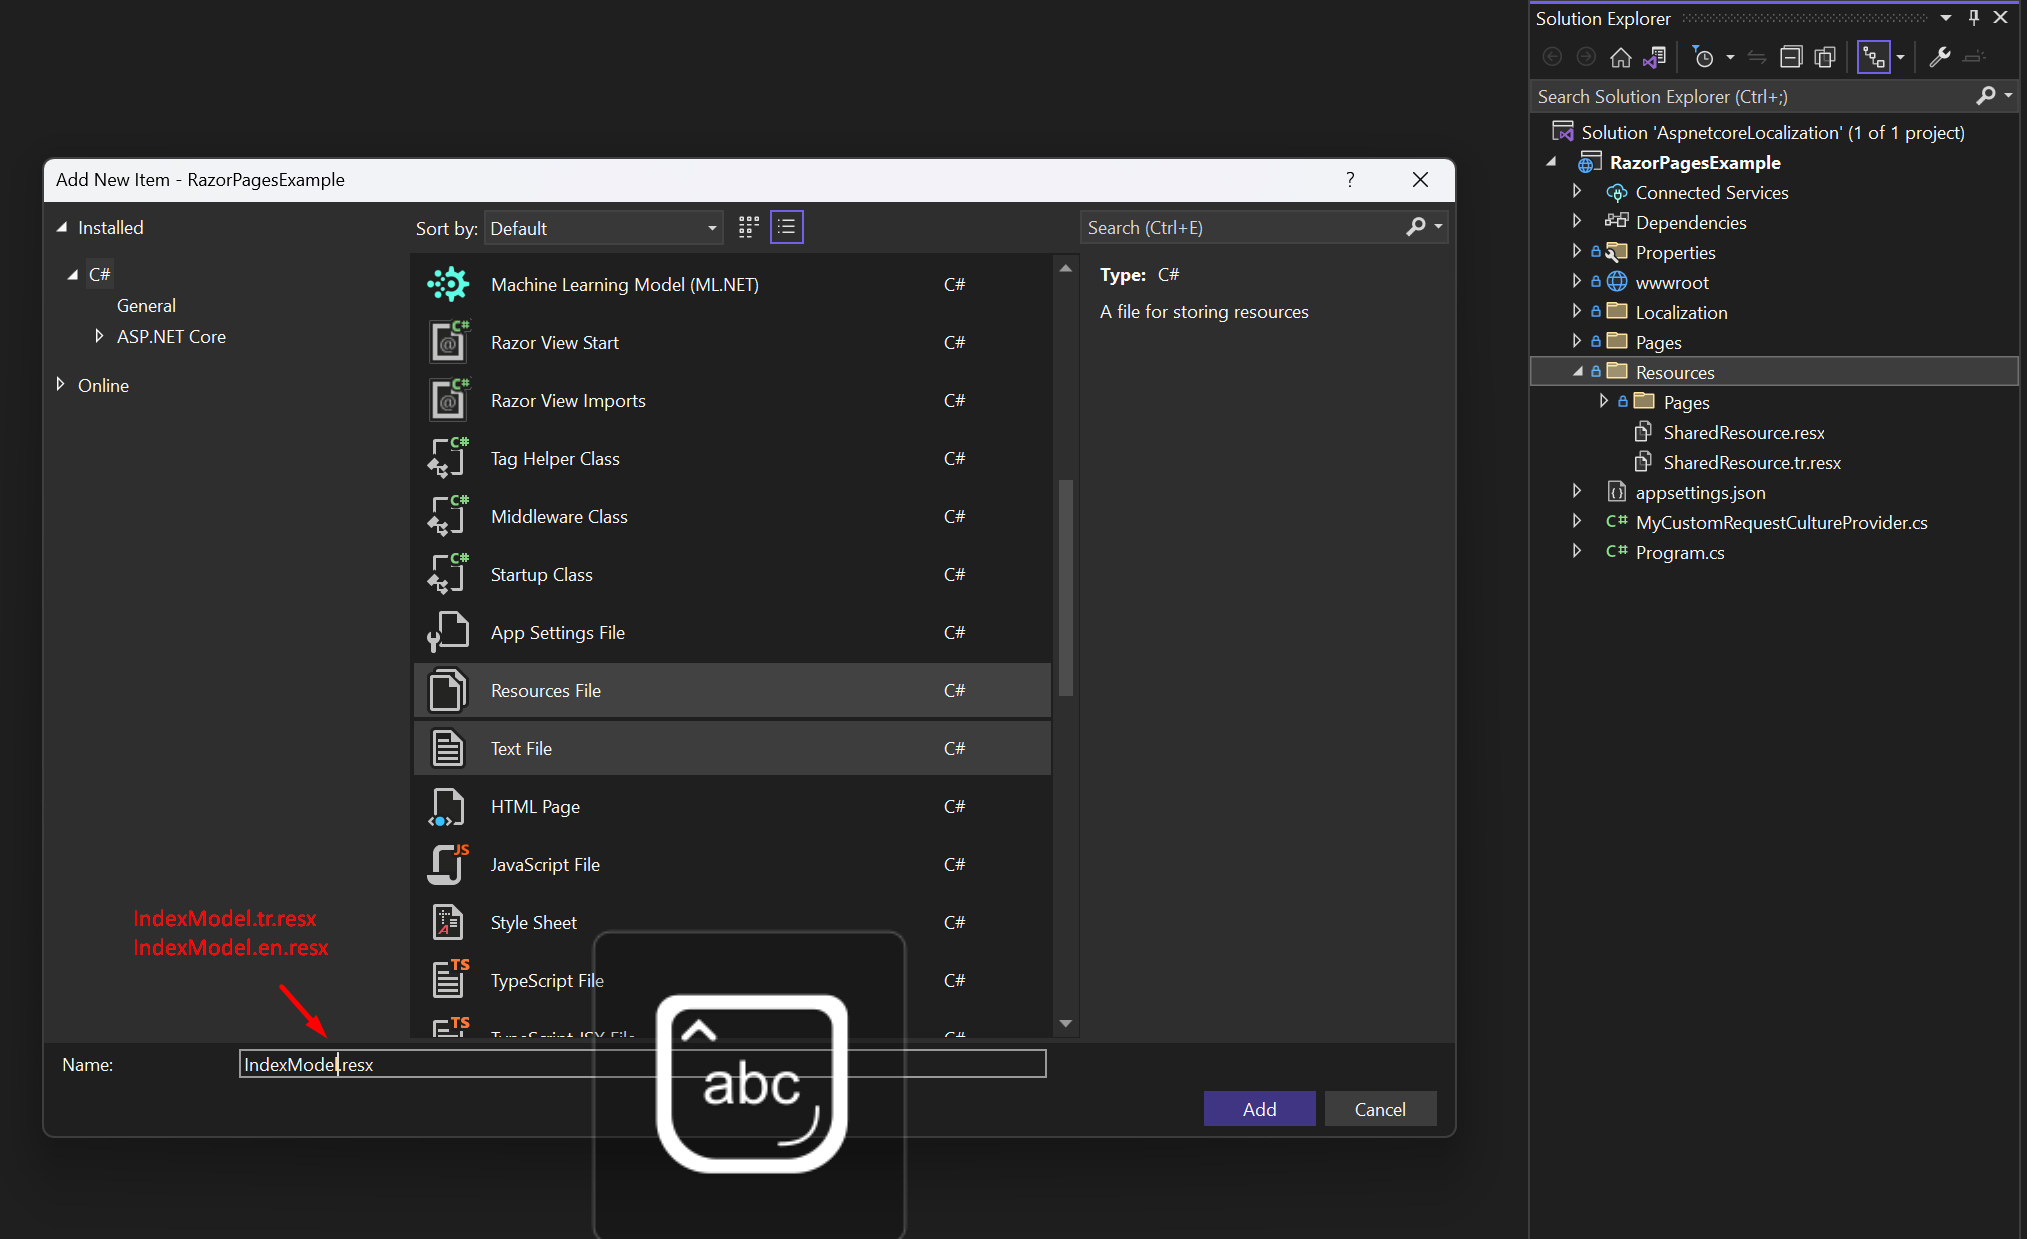
Create Localization Resources
The next step is to create the localization resources for your application. These resources include text strings, images, and other content that needs to be localized.
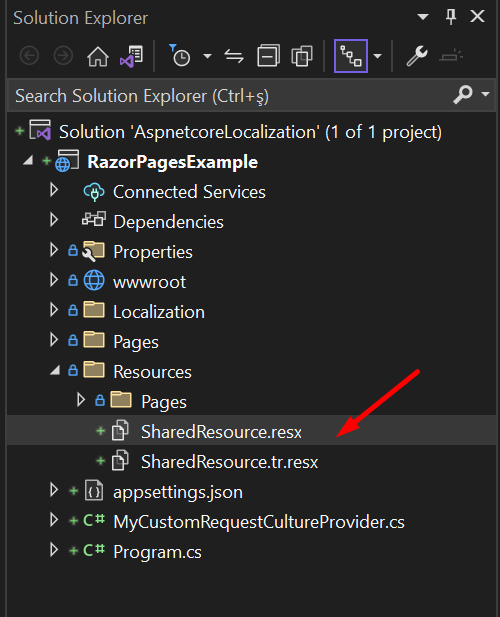
By convention, resource files should be separated into a separate folder called Resources. When naming these files, they should follow the name of the class that will consume them, as well as include the language they represent.
We can either organize the files into separate folders, such as Resources/Pages/IndexModel.resx, or leave them in the root Resources folder, ensuring to name them appropriately, in this case Resources/Pages.IndexModel.resx.
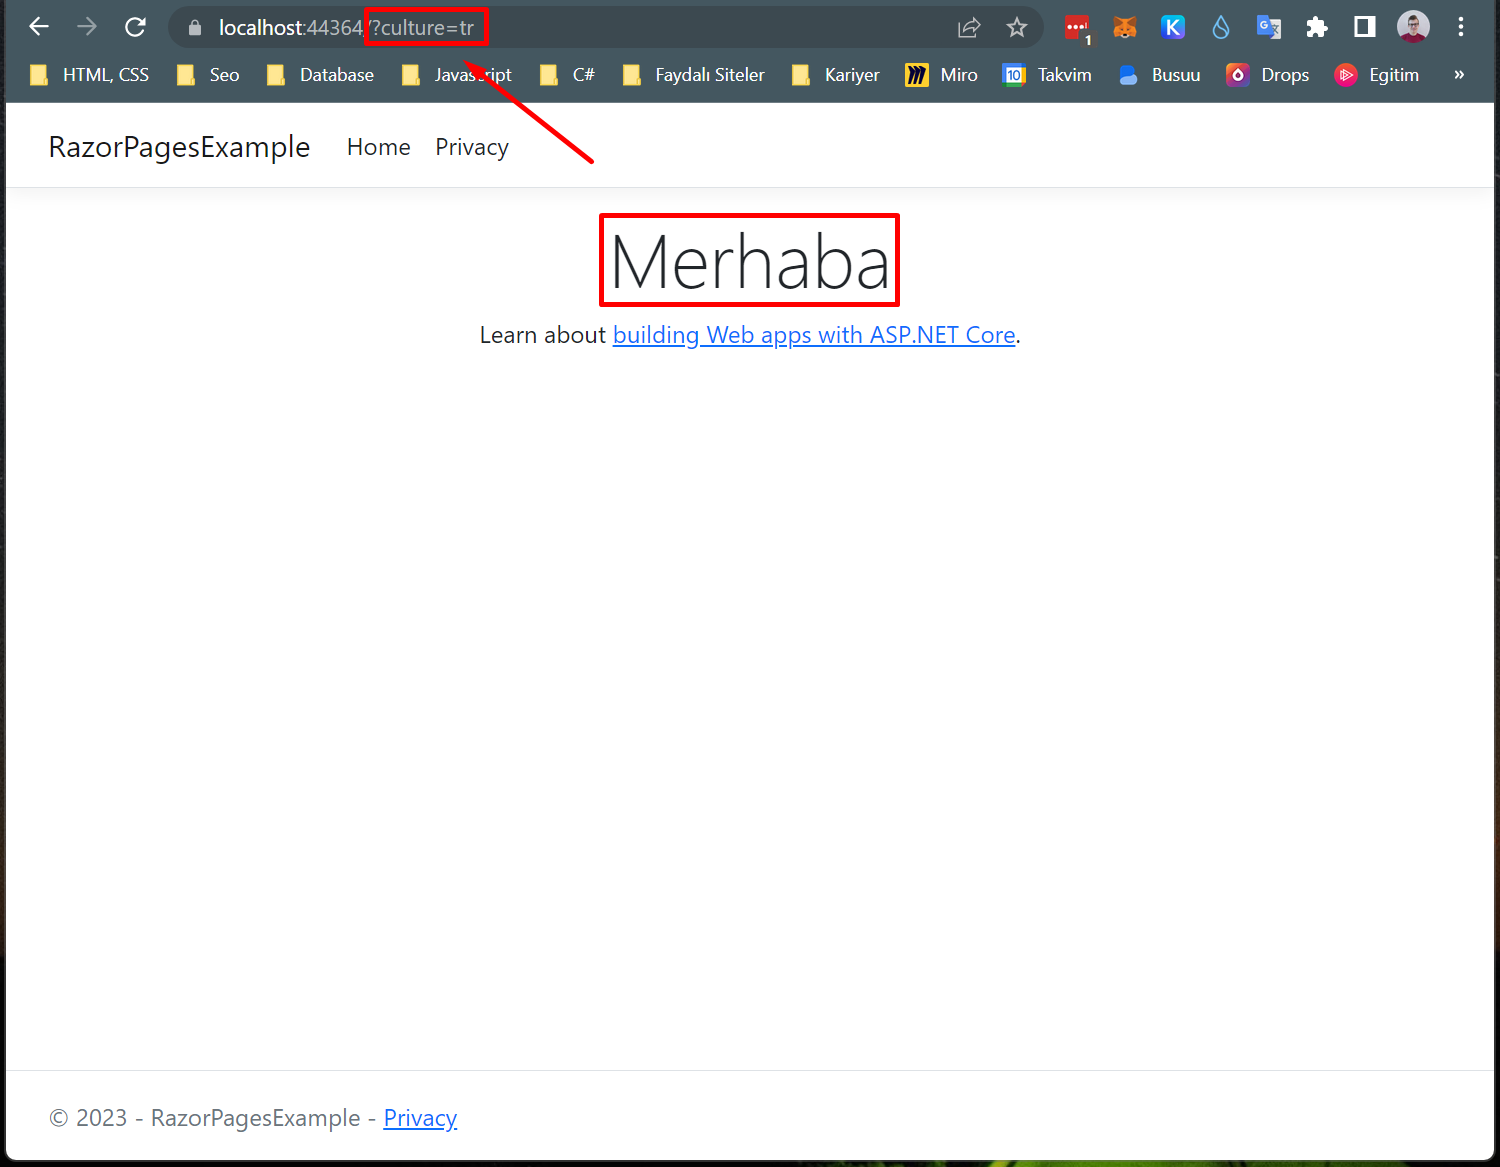
In the .resx file, you can add key/value pairs for each localized string or other resource. For example, you might add a key called Greeting with a value of Bonjour for French or Merhaba for Turkish.
Access Localization Resources in Code
Localization in Razor Pages and localization in MVC are very similar.
Once you've created your localization resources, you can access them in your code. To do this, you'll need to inject an instance of the IStringLocalizer<T>, IHtmlLocalizer<T> or IViewLocalizer<T> (According to your requirement) interface into your class.
Here's an example of how to access a localized string in C#:
using Microsoft.AspNetCore.Mvc.RazorPages;
using Microsoft.Extensions.Localization;

namespace RazorPagesExample.Pages;

public class IndexModel : PageModel
{
    private readonly IStringLocalizer<IndexModel> _localizer;

    public IndexModel(IStringLocalizer<IndexModel> localizer)
    {
        _localizer = localizer;
    }

    public void OnGet()
    {
        var message = _localizer["Message"];
        ViewData["Message"] = message;
    }
}
Here's an example of how to use localization in a Razor view:
@page
@using Microsoft.Extensions.Localization
@model IndexModel
@inject IStringLocalizer<IndexModel> L
@{
ViewData["Title"] = "Home page";
}
<div class="text-center">
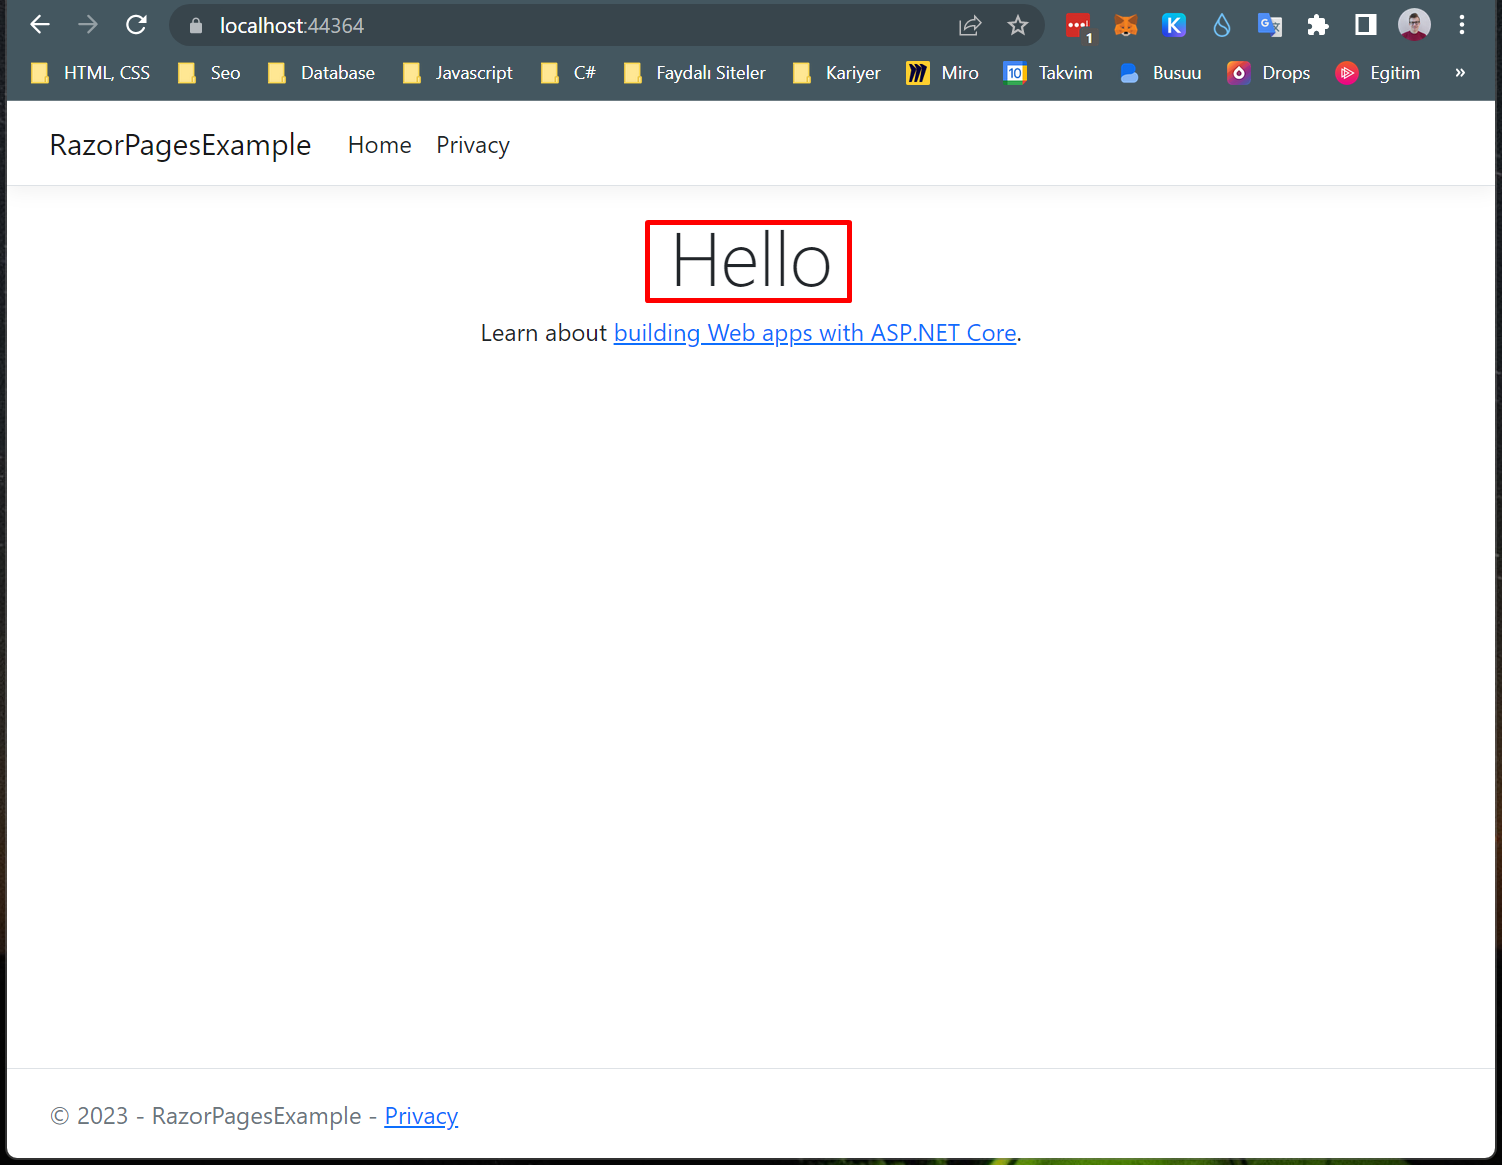
<h1 class="display-4">@L["Greeting"]</h1>
<p>Learn about <a href="https://docs.microsoft.com/aspnet/core">building Web apps with ASP.NET Core</a>.</p>
</div>
Default language
Turkish language
ASP.NET Core Request Culture Providers
Request Culture Providers are a mechanism for determining the user's preferred culture based on information provided in the HTTP request. When a request is made to your application, the Request Culture Provider will examine the request headers and query parameters to determine the user's preferred culture.
There are several built-in Request Culture Providers in ASP.NET Core, including:
QueryStringRequestCultureProvider: Determines the user's preferred culture based on a culture or ui-culture query parameter in the request URL. (default)CookieRequestCultureProvider: Determines the user's preferred culture based on a cookie set in the user's browser.AcceptLanguageHeaderRequestCultureProvider: Determines the user's preferred culture based on theAccept-Languageheader in the request.
Using Request Culture Providers in ASP.NET Core
To use Request Culture Providers in your ASP.NET Core application, you'll need to add them to the RequestLocalizationOptions in your application.
services.Configure<RequestLocalizationOptions>(options =>
{
    ...

    options.RequestCultureProviders = new List<IRequestCultureProvider>
    {
        new AcceptLanguageHeaderRequestCultureProvider()
    };
    options.RequestCultureProviders.Insert(0, );
});
Custom Request Culture Provider
You can also create custom request culture providers to support custom ways of determining the user's preferred culture.
To create a custom Request Culture Provider, you'll need to implement the IRequestCultureProvider interface and override the DetermineProviderCultureResult(HttpContext) method. This method should return a ProviderCultureResult object that contains the user's preferred culture.
Here's an example of a custom request culture provider that determines the user's preferred culture based on a custom HTTP header:
public class MyCustomRequestCultureProvider : RequestCultureProvider
{
    public override async Task<ProviderCultureResult?> DetermineProviderCultureResult (HttpContext httpContext)
    {
        await Task.Yield();
        return new ProviderCultureResult("tr");
    }
}
Add the custom Request Culture Provider to the RequestLocalizationOptions in your application:
services.Configure<RequestLocalizationOptions>(options =>
{
    ...

    options.RequestCultureProviders = new List<IRequestCultureProvider>
    {
        new MyCustomRequestCultureProvider()
    };

});
Localization in Data Annotations
Data annotations are attributes that are applied to model properties to specify how they should be validated and displayed. In ASP.NET Core, data annotations can be used to perform validation on model properties, such as ensuring that a property has a minimum or maximum value, or that it matches a certain pattern.
To add localization to data annotations, we need to create resource files for each language we want to support, and then apply the appropriate attributes to our model properties.
Using Data Annotations in ASP.NET Core
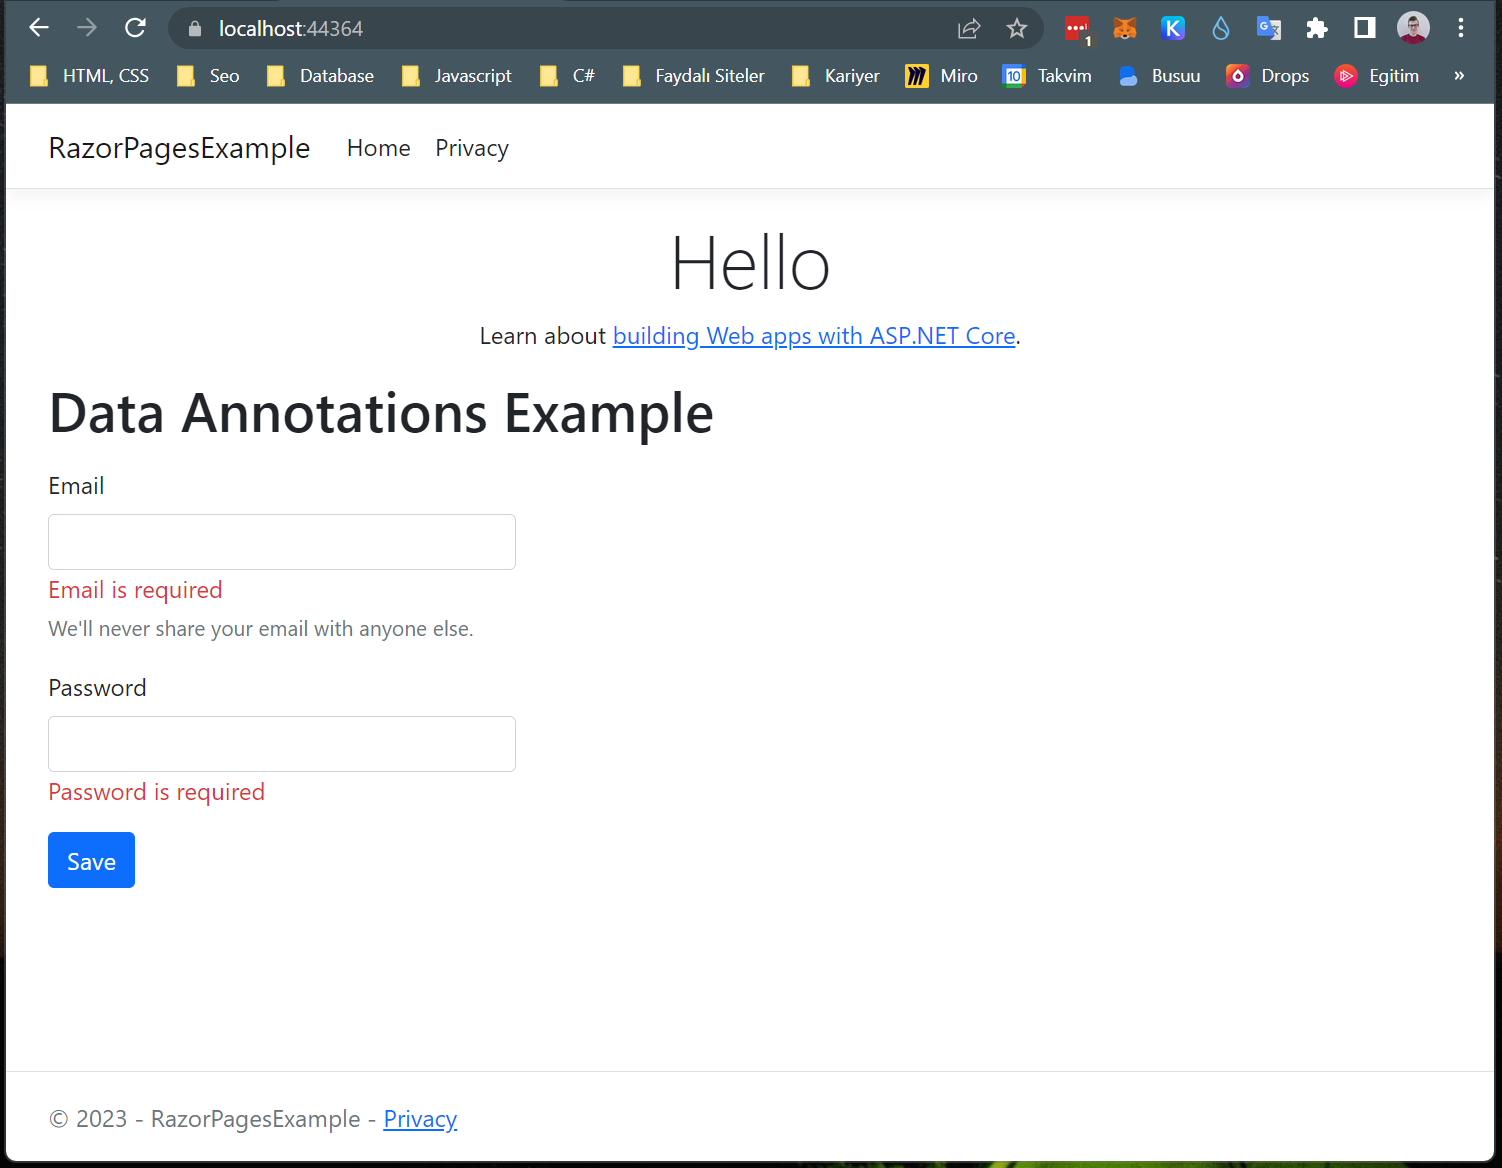
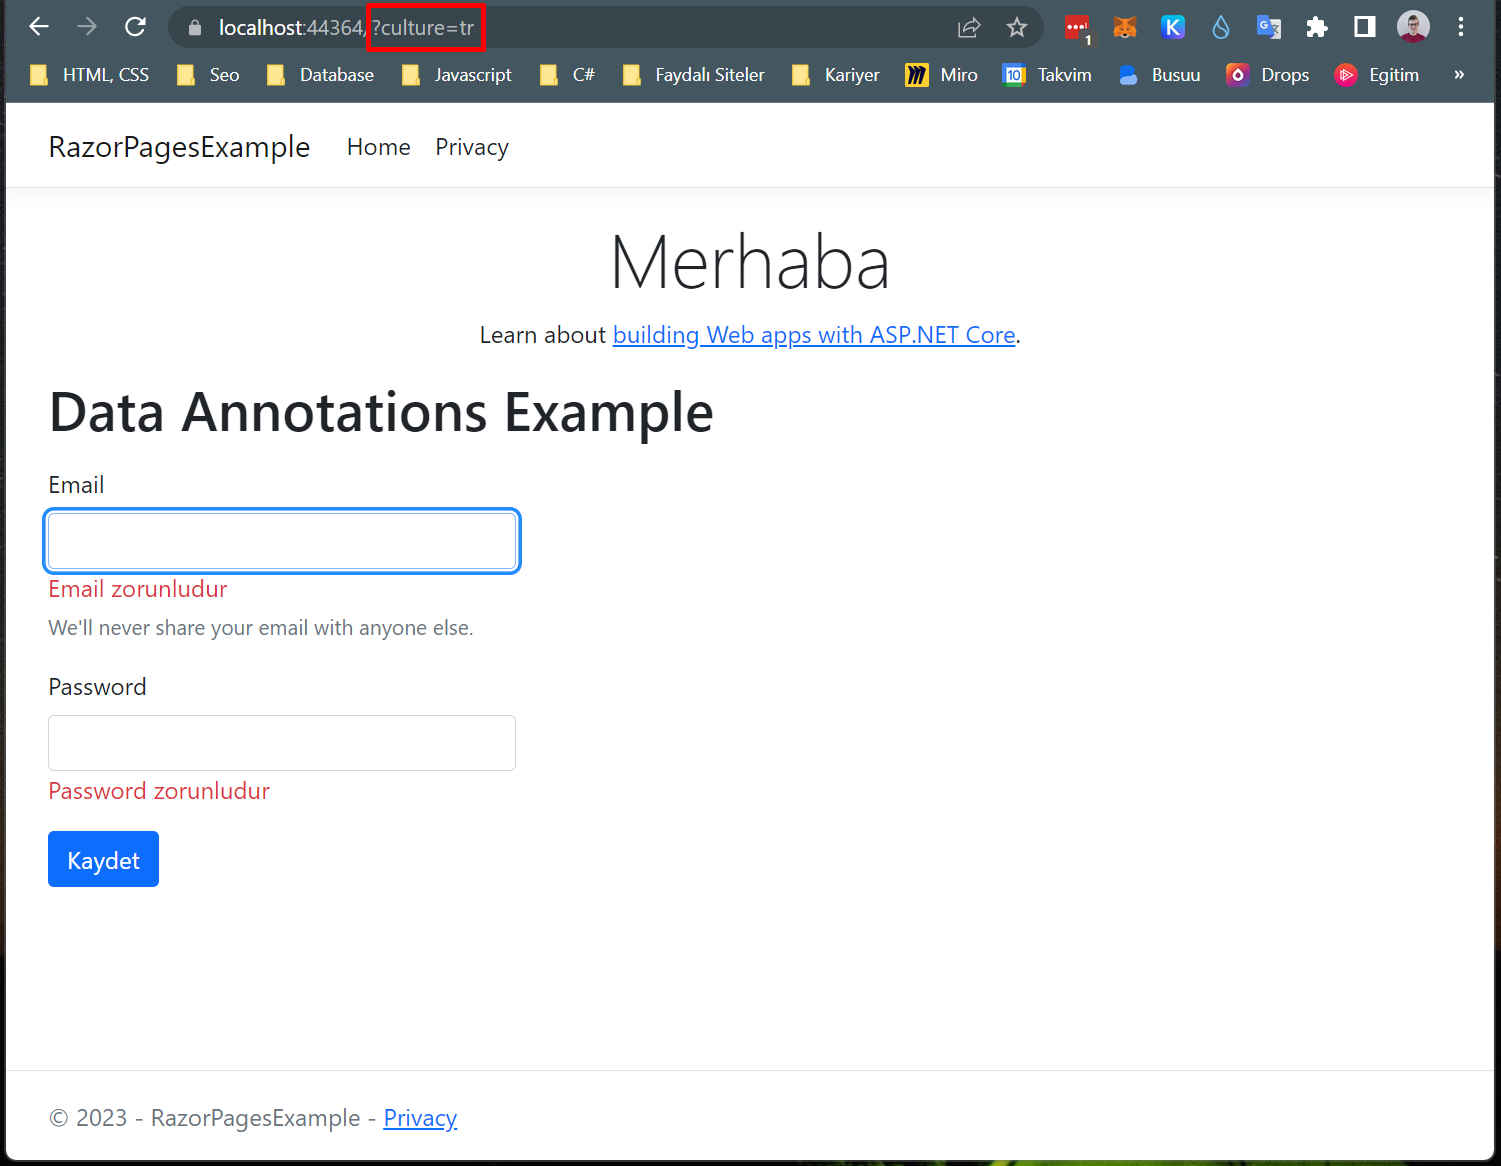
Let's consider an example where we want to create a login form that includes an email field. We want to ensure that the email address and password is required.
[Display(Name = "Email")]
[Required(ErrorMessage = "{0} is required")]
[BindProperty]
public string Email { get; set; }

[Display(Name = "Password")]
[Required(ErrorMessage = "{0} is required")]
[BindProperty]
public string Password { get; set; }
Let's create a simple form interface using Bootstrap. We'll use the asp-for attribute to bind the form fields to the model properties.
<div class="mt-2">
    <h1 class="mb-3">Data Annotations Example</h1>
    <form class="col-4">
        <div class="mb-3">
            <label asp-for="Email" class="form-label"></label>
            <input asp-for="Email" type="email" class="form-control" aria-describedby="emailHelp">
            <span asp-validation-for="Email" class="text-danger"></span>
            <div id="emailHelp" class="form-text">We'll never share your email with anyone else.</div>
        </div>
        <div class="mb-3">
            <label asp-for="Password" class="form-label"></label>
            <input asp-for="Password" type="password" class="form-control" id="exampleInputPassword1">
            <span asp-validation-for="Password" class="text-danger"></span>
        </div>
        <button type="submit" class="btn btn-primary">Submit</button>
    </form>
</div>

@section Scripts
{
    <partial name="Shared/_ValidationScriptsPartial"/>
}
Add data annotations localization to your application by calling the AddDataAnnotationsLocalization method.
builder.Services.AddRazorPages().AddDataAnnotationsLocalization();
Default language
Turkish language
Using Shared Resources
In some cases, you may want to share localization resources between pages. For example, you may want to share a resource file that contains common strings, such as "Save", "Cancel", "Edit", "Delete", etc.
To share localization resources between pages, you'll need to create a shared resource file.
Using Shared Resources in ASP.NET Core
Create a custom localizer that implements the ISharedViewLocalizer interface. This interface contains a GetLocalizedString method and key that will be used to access the shared resource file.
public interface ISharedViewLocalizer
{
    public LocalizedString this[string key]
    {
        get;
    }

    LocalizedString GetLocalizedString(string key);
}

public class SharedResource
{

}

public class SharedViewLocalizer : ISharedViewLocalizer
{
    private readonly IStringLocalizer _localizer;

    public SharedViewLocalizer(IStringLocalizerFactory factory)
    {
        var type = typeof(SharedResource);
        var assemblyName = new AssemblyName(type.GetTypeInfo().Assembly.FullName);
        _localizer = factory.Create("SharedResource", assemblyName.Name);
    }

    public LocalizedString this[string key] => _localizer[key];

    public LocalizedString GetLocalizedString(string key)
    {
        return _localizer[key];
    }
}
Once you've created your custom localizer, you can access them in your code. To do this, you'll need to inject an instance of the ISharedViewLocalizer interface into your class or page.
@page

...

@inject ISharedViewLocalizer SharedLocalizer

...

<button type="submit" class="btn btn-primary">@SharedLocalizer["Save"]</button>
Using Shared Resources in Data Annotations
To use shared resources in data annotations, you'll need to configure the DataAnnotationLocalizerProvider. This provider is used to determine which resource file to use for data annotations.
builder.Services.AddRazorPages().AddDataAnnotationsLocalization(options =>
{
    options.DataAnnotationLocalizerProvider = (type, factory) =>
    {
        var assemblyName = new AssemblyName(typeof(SharedResource).GetTypeInfo().Assembly.FullName);

        return factory.Create("SharedResource", assemblyName.Name);
    };
});
ASP.NET Zero Solution
ASP.NET Zero is a starting point for new web applications with a modern architecture, best practices and most used tools. It is a framework that can be used to create a new application from scratch.
ASP.NET Zero comes with built-in localization and language management capabilities, requiring no setup upon installation. You can manage your language files using RESX, XML, and JSON formats. Additionally, the language management page enables you to add new languages and edit translations for existing languages. With the multi-tenancy feature in Asp.Net Zero, your tenants can customize language translations according to their needs. For more information, please refer to our detailed documentation.
Conclusion
In this article, we've covered the basics of implementing localization in an ASP.NET Core application. By adding localization middleware, creating localization resources, accessing them in code, and using them in views, you can create a multilingual website or application that's accessible to users.