---
title: "Using ASP.NET Zero with DevExtreme (Mvc)"
description: "ASP.NET Zero is the base solution for building robust and scalable web applications. Unlock your full potential today!"
url: "https://aspnetzero.com/blog/using-asp.net-zero-with-devextreme-mvc"
image: "https://aspnetzero.com/Images/Blog/using-asp.net-zero-with-devextreme-mvc.png"
---
[Blog](https://aspnetzero.com/blog)
# Using ASP.NET Zero with DevExtreme (Mvc)
02 March 2022 9 min read [MVC](https://aspnetzero.com/blog/topics/mvc) [Dev Express](https://aspnetzero.com/blog/topics/dev-express)
Share [X](https://twitter.com/intent/tweet?url=https%3A%2F%2Faspnetzero.com%2Fblog%2Fusing-asp.net-zero-with-devextreme-mvc&text=Using+ASP.NET+Zero+with+DevExtreme+%28Mvc%29) [LinkedIn](https://www.linkedin.com/sharing/share-offsite/?url=https%3A%2F%2Faspnetzero.com%2Fblog%2Fusing-asp.net-zero-with-devextreme-mvc) [Reddit](https://reddit.com/submit?url=https%3A%2F%2Faspnetzero.com%2Fblog%2Fusing-asp.net-zero-with-devextreme-mvc&title=Using+ASP.NET+Zero+with+DevExtreme+%28Mvc%29) [Hacker News](https://news.ycombinator.com/submitlink?u=https%3A%2F%2Faspnetzero.com%2Fblog%2Fusing-asp.net-zero-with-devextreme-mvc&t=Using+ASP.NET+Zero+with+DevExtreme+%28Mvc%29)
# Using ASP.NET Zero with DevExtreme MVC Part 1
In this tutorial, we will guide you through the process of creating a robust and feature-rich phonebook application using ASP.NET Zero, which is built on ASP.NET Core and Mvc. By following the steps outlined here, you will learn how to develop a multi-tenant application that supports localization, authorization, configurability, and testability.
ASP.NET Zero provides a solid foundation for building enterprise-level applications with its comprehensive set of pre-built features and functionalities. By leveraging the power of ASP.NET Core on the server-side and Mvc on the client-side, you can create a modern and responsive web application.
By the end of this tutorial, you will have a solid understanding of how to use ASP.NET Zero and DevExtreme Mvc together to develop powerful applications that are both user-friendly and highly functional. So, let's dive in and start building our phonebook application step by step.
First of all you should follow that directions and implement DevExtreme to your existing project.
Non visual studio project: https://docs.devexpress.com/AspNetCore/401027/devextreme-based-controls/get-started/configure-a-non-visual-studio-project?v=19.1
Visual studio project: https://docs.devexpress.com/AspNetCore/401026/devextreme-based-controls/get-started/configure-a-visual-studio-project?v=19.1
Then, go to `bundles.json` file of `*.Mvc` project.
Find `app-layout-libs.min.js` and remove `node_modules/jquery/dist/jquery.js` from it.
## Creating & Running the Project
We're creating and downloading the solution named `Acme.PhoneBookDemo` as described in [Getting Started (Getting-Started-Core) document. After opening solution in Visual Studio, we see an NLayered solution that consists of eight projects:
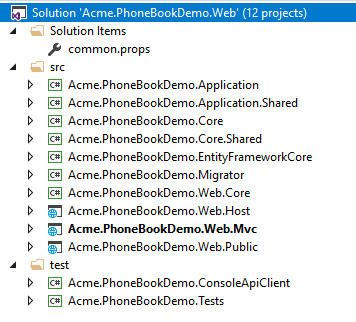
Also, run database migrations, create the database and login to the application as described in [Getting Started](https://aspnetzero.com/blog/Getting-Started-Core) document. After all completed and logged in to the application, we see a dashboard as shown below:
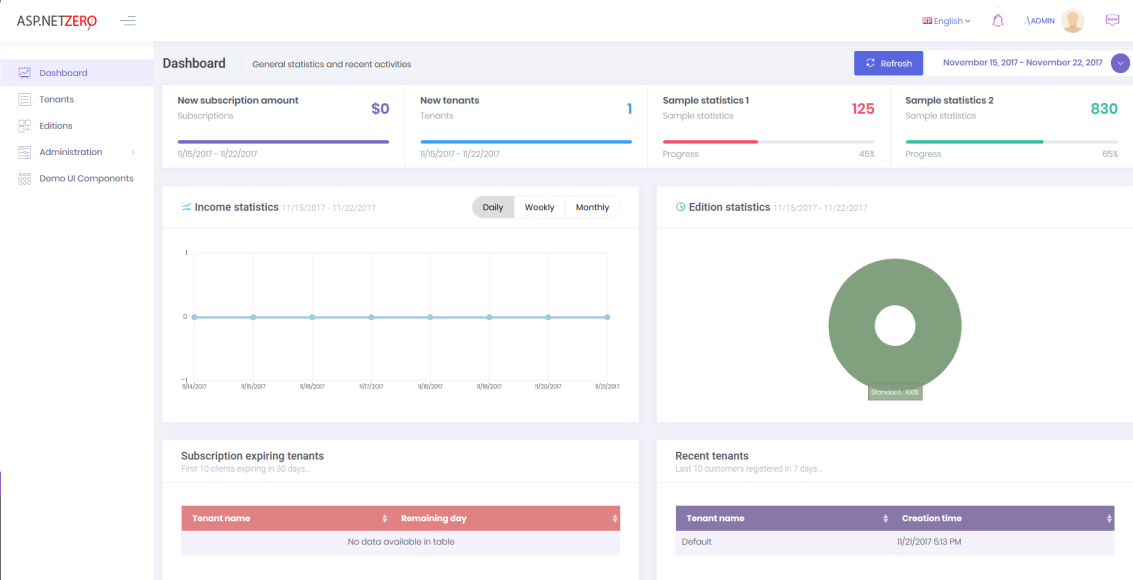
Logout from the application for now. We will make our application **single-tenant** (we will convert it to multi-tenant later). So, we open `PhoneBookDemoConsts` class in the `Acme.PhoneBookDemo.Core` project and disable multi-tenancy as shown below:
```csharp
public class PhoneBookDemoConsts
{
public const string LocalizationSourceName = "PhoneBookDemo";
public const string ConnectionStringName = "Default";
public const bool MultiTenancyEnabled = false;
public const int PaymentCacheDurationInMinutes = 30;
}
```
## Adding a New Menu Item
Let's begin from UI and create a new page named **Phone book**.
### Defining a menu item
`AppNavigationProvider` class defines menus in the application. When we change this class, menus are automatically changed. Open this class and create new menu item as shown below (You can add it right after the dashboard menu item).
```csharp
.AddItem(new MenuItemDefinition(
AppPageNames.Tenant.PhoneBook,
L("PhoneBook"),
url: "App/PhoneBook",
icon: "glyphicon glyphicon-book"
)
)
```
Every menu item must have a **unique name** to identify this menu item. Menu names are defined in AppPageNames class as constants. We add a new constant: `PhoneBook`.
### Localizing Menu Item Display Name
A menu item should also have a **localizable shown name**. It's used to display menu item on the page. `L("PhoneBook")` is the localized name of our new menu. `L` method is a helper method gets a localization key and simply returns a `LocalizableString` object (see `AppNavigationProvider` class).
Localization strings are defined in `XML` files in `.Core` project as shown below:
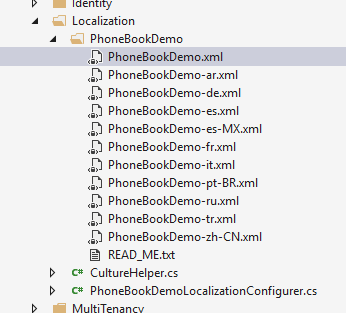
Open `PhoneBook.xml` (the **default**, **English** localization dictionary) and add the following line:
```xml
Phone book
```
If we don't define **PhoneBook**"s value for other localization dictionaries, default value is shown in all languages. We can define it also for **Turkish** in `PhoneBook-tr.xml` file:
```xml
Telefon Rehberi
```
### Other menu item properties
**url** can be a URL (it's URL of an **MVC Action** here) that will be redirected when we click the menu item.
Lastly, **icon** is the shown menu icon for new menu item. It can be a **css** class. We can use Glyphicon, Font-Awesome or another css font library here.
See [navigation document](https://aspnetboilerplate.com/Pages/Documents/Navigation) for more information on menu definitions.
## Creating the Page
After creating the menu item, we can create an empty page.
### Controller
Creating the `PhoneBookController` under `Areas/App Controllers` folder in the Web project:
```csharp
[Area("App")]
public class PhoneBookController : PhoneBookDemoControllerBase
{
public ActionResult Index()
{
return View();
}
}
```
We inherited from `PhoneBookDemoControllerBase` (will be *YourProjectName*ControllerBase for your projects) instead of MVC's standard Controller class. While it will work if we derive from the standard Controller, PhoneBookDemoControllerBase provides very useful base properties and methods. So, always inherit from this class unless it has a disadvantage for your case.
### View
Creating an empty view, `Index.cshtml` under `Areas/App/Views/PhoneBook` folder:
```html
@using Acme.PhoneBookDemo.Web.Areas.App.Startup
@{
ViewBag.CurrentPageName = AppPageNames.Tenant.PhoneBook;
}
PHONE BOOK CONTENT COMES HERE!
```
We set `ViewBag.CurrentPageName` to the current page's name to automatically highlight the related menu item when this page is active. Now, it's time to run application and see the new phone book page:
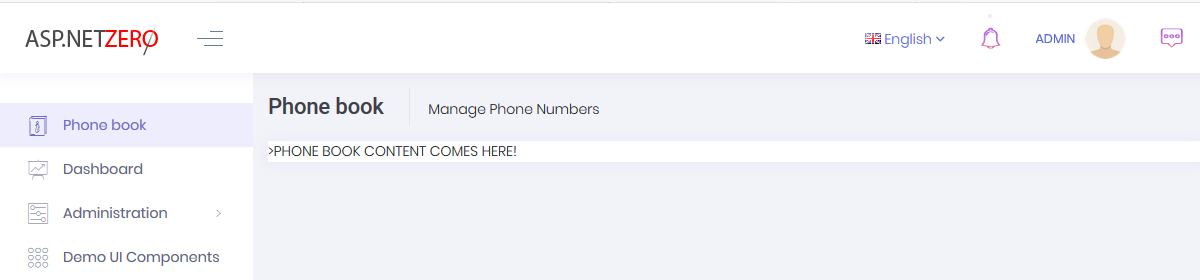
Menu item display name and page title are localized. Try to change UI language to see difference.
## Creating Person Entity
We define entities in `.Core` (domain) project. We can define a `Person` entity (mapped to `PbPersons` table in database) to represent a person in phone book as shown below:
```csharp
[Table("PbPersons")]
public class Person : FullAuditedEntity
{
[Required]
[MaxLength(PersonConsts.MaxNameLength)]
public virtual string Name { get; set; }
[Required]
[MaxLength(PersonConsts.MaxSurnameLength)]
public virtual string Surname { get; set; }
[MaxLength(PersonConsts.MaxEmailAddressLength)]
public virtual string EmailAddress { get; set; }
}
```
Person's `primary key` type is `int` (as default). It inherits `FullAuditedEntity` that contains `creation`, `modification` and `deletion` audit properties. It's also `soft-delete`. When we delete a person, it's not deleted by database but marked as deleted (see [entity](https://aspnetboilerplate.com/Pages/Documents/Entities) and [data filters](https://aspnetboilerplate.com/Pages/Documents/Data-Filters) documentations for more information). We created `PersonConsts` in `Core.Shared` project for `MaxLength` properties. This is a good practice since we will use same values later.
```csharp
public class PersonConsts
{
public const int MaxNameLength = 32;
public const int MaxSurnameLength = 32;
public const int MaxEmailAddressLength = 255;
}
```
We add a `DbSet` property for Person entity to `PhoneBookDemoDbContext` class defined in `EntityFrameworkCore` project.
```csharp
public class PhoneBookDemoDbContext : AbpZeroDbContext
{
public virtual DbSet Persons { get; set; }
//...other entities
public PhoneBookDemoDbContext()
: base("Default")
{
}
//...other codes
}
```
## Database Migrations for Person
We use **Entity Framework Code-First migrations** to migrate database schema. Since we added `Person` entity, our `DbContext` model is changed. So, we should create a **new migration** to create the new table in the database.
### Creating Migration
Open **Package Manager Console**, run the `Add-Migration "Added_Persons_Table"` command as shown below:
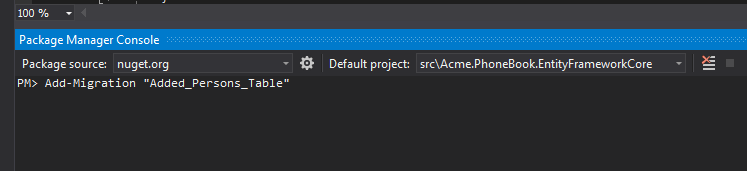
This command will add a **migration class** named `Added_Persons_Table` as shown below:
```csharp
public partial class Added_Persons_Table : Migration
{
protected override void Up(MigrationBuilder migrationBuilder)
{
migrationBuilder.CreateTable(
name: "PbPersons",
columns: table => new
{
Id = table.Column(nullable: false)
.Annotation("SqlServer:ValueGenerationStrategy", SqlServerValueGenerationStrategy.IdentityColumn),
CreationTime = table.Column(nullable: false),
CreatorUserId = table.Column(nullable: true),
DeleterUserId = table.Column(nullable: true),
DeletionTime = table.Column(nullable: true),
EmailAddress = table.Column(maxLength: 255, nullable: true),
IsDeleted = table.Column(nullable: false),
LastModificationTime = table.Column(nullable: true),
LastModifierUserId = table.Column(nullable: true),
Name = table.Column(maxLength: 32, nullable: false),
Surname = table.Column(maxLength: 32, nullable: false)
},
constraints: table =>
{
table.PrimaryKey("PK_PbPersons", x => x.Id);
});
}
protected override void Down(MigrationBuilder migrationBuilder)
{
migrationBuilder.DropTable(
name: "PbPersons");
}
}
```
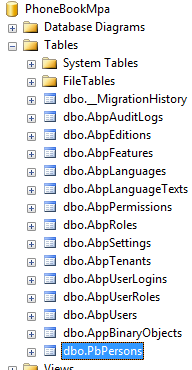
We don't have to know so much about format and rules of this file. But, it's suggested to have a basic understanding of migrations. In the same Package Manager Console, we write `Update-Database` command in order to apply the new migration to database. After updating, we can see that `PbPersons` table is added to database.
### Database Seeding
But this new table is empty. In ASP.NET Zero, there are some classes to fill initial data for users and settings:
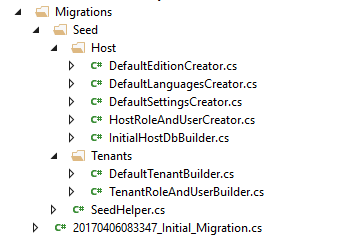
So, we can add a separated class to fill some people to database as shown below:
```csharp
namespace Acme.PhoneBookDemo.Migrations.Seed.Host
{
public class InitialPeopleCreator
{
private readonly PhoneBookDemoDbContext _context;
public InitialPeopleCreator(PhoneBookDemoDbContext context)
{
_context = context;
}
public void Create()
{
var douglas = _context.Persons.FirstOrDefault(p => p.EmailAddress == "douglas.adams@fortytwo.com");
if (douglas == null)
{
_context.Persons.Add(
new Person
{
Name = "Douglas",
Surname = "Adams",
EmailAddress = "douglas.adams@fortytwo.com"
});
}
var asimov = _context.Persons.FirstOrDefault(p => p.EmailAddress == "isaac.asimov@foundation.org");
if (asimov == null)
{
_context.Persons.Add(
new Person
{
Name = "Isaac",
Surname = "Asimov",
EmailAddress = "isaac.asimov@foundation.org"
});
}
}
}
}
```
These type of default data is good since we can also use these data in **unit tests**. Surely, we should be careful about seed data since this code will always be executed in each `PostInitialize` of your `PhoneBookEntityFrameworkCoreModule`. This class (`InitialPeopleCreator`) is created and called in `InitialHostDbBuilder` class. This is not so important, just for a good code organization (see source codes).
```csharp
public class InitialHostDbBuilder
{
//existing codes...
public void Create()
{
//existing codes...
new InitialPeopleCreator(_context).Create();
_context.SaveChanges();
}
}
```
We run our project again, it runs seed and adds two people to `PbPersons` table:

## Conclusion
In this tutorial, we have explored the process of creating a phonebook application using ASP.NET Zero, which is built on ASP.NET Core and Mvc, and integrated with DevExtreme components.
### Summary
- We started by creating and setting up the ASP.NET Zero solution, following the instructions in the Getting Started document. We logged in as the default tenant admin and familiarized ourselves with the dashboard.
- We made the application **single-tenant** by disabling multi-tenancy in the `PhoneBookDemoConsts` class.
- Next, we added a new menu item for the phonebook page by defining a menu item in the `AppNavigationService` class. We also localized the menu item display name by adding the necessary entries in the localization XML files.
- Moving to the server-side, we created a `Person` entity to represent a person in the phonebook and added it to the `PhoneBookDemoDbContext`.
- We used Entity Framework **Code-First** Migrations to create a new migration for the `Person` entity and applied it to the database. This created the `PbPersons` table in the database.
- Finally, we added seed data to the `Person` table using the `InitialPeopleCreator` class, which was called in the `InitialHostDbBuilder`. This allowed us to have some initial data in the database.
### What's Next?
In the next tutorial, we will add a **application service** to manage the phonebook. We will also add a **unit test** for the application service. Finally, we will add a **new page** to the **mvc** application to display the phonebook.
See the [next part](https://aspnetzero.com/blog/using-asp.net-zero-with-devextreme-mvc-part-2) of this tutorial.
## See the full documentation
Explore detailed guides, API references, and step-by-step tutorials for ASP.NET Zero.
[Browse documentation](https://aspnetzero.com/documents)
## Have questions before purchasing?
Schedule a free consultation with our team to find the right plan for your project.
[Schedule a meeting](https://aspnetzero.com/schedule-meeting)
## You might also like
### [Business Benefits of Using ASP.NET Zero for Enterprise Software Development](https://aspnetzero.com/blog/business-benefits-of-aspnetzero)
11 September 2026
### [Common Mistakes and Errors When Hosting ASP.NET Core Apps](https://aspnetzero.com/blog/common-mistakes-and-errors-hosting-aspnet-core-apps)
26 August 2026
### [Using AutoMapper After Migrating to Mapperly](https://aspnetzero.com/blog/using-automapper-after-migrating-to-mapperly)
04 August 2026
## Recent posts
### [Business Benefits of Using ASP.NET Zero for Enterprise Software Development](https://aspnetzero.com/blog/business-benefits-of-aspnetzero)
11 September 2026
### [Common Mistakes and Errors When Hosting ASP.NET Core Apps](https://aspnetzero.com/blog/common-mistakes-and-errors-hosting-aspnet-core-apps)
26 August 2026
### [Using AutoMapper After Migrating to Mapperly](https://aspnetzero.com/blog/using-automapper-after-migrating-to-mapperly)
04 August 2026
## Start building with ASP.NET Zero
Full source code, premium support, Angular, React & MVC UI options.
[View pricing](https://aspnetzero.com/pricing)
## Topics