---
title: "How to Integrate KendoUI Angular with ASP.NET Zero"
description: "ASP.NET Zero is the base solution for building robust and scalable web applications. Unlock your full potential today!"
url: "https://aspnetzero.com/blog/how-to-integrate-kendoui-angular-with-asp.net-zero"
image: "https://aspnetzero.com/Images/Blog/how-to-integrate-kendo-angular-with-anz_8c65.png"
---
[Blog](https://aspnetzero.com/blog)
# How to Integrate KendoUI Angular with ASP.NET Zero
22 February 2024 10 min read [Angular](https://aspnetzero.com/blog/topics/angular) [Telerik](https://aspnetzero.com/blog/topics/telerik)

Share [X](https://twitter.com/intent/tweet?url=https%3A%2F%2Faspnetzero.com%2Fblog%2Fhow-to-integrate-kendoui-angular-with-asp.net-zero&text=How+to+Integrate+KendoUI+Angular+with+ASP.NET+Zero) [LinkedIn](https://www.linkedin.com/sharing/share-offsite/?url=https%3A%2F%2Faspnetzero.com%2Fblog%2Fhow-to-integrate-kendoui-angular-with-asp.net-zero) [Reddit](https://reddit.com/submit?url=https%3A%2F%2Faspnetzero.com%2Fblog%2Fhow-to-integrate-kendoui-angular-with-asp.net-zero&title=How+to+Integrate+KendoUI+Angular+with+ASP.NET+Zero) [Hacker News](https://news.ycombinator.com/submitlink?u=https%3A%2F%2Faspnetzero.com%2Fblog%2Fhow-to-integrate-kendoui-angular-with-asp.net-zero&t=How+to+Integrate+KendoUI+Angular+with+ASP.NET+Zero)
# How to Integrate Kendo UI Angular with ASP.NET Zero
In this blog post, we will integrate Kendo UI Angular with ASP.NET Zero. We will create a product crud app and display data with Kendo UI's Angular Grid component. Let's dive in.
## Create a New ASP.NET Zero Project
First, create a new project using the [ASP.NET Zero](https://aspnetzero.com/Download).
- Select the `ASP.NET Core & Angular` template.
- You can choose single solution option if you want to have the backend and frontend in a single solution.
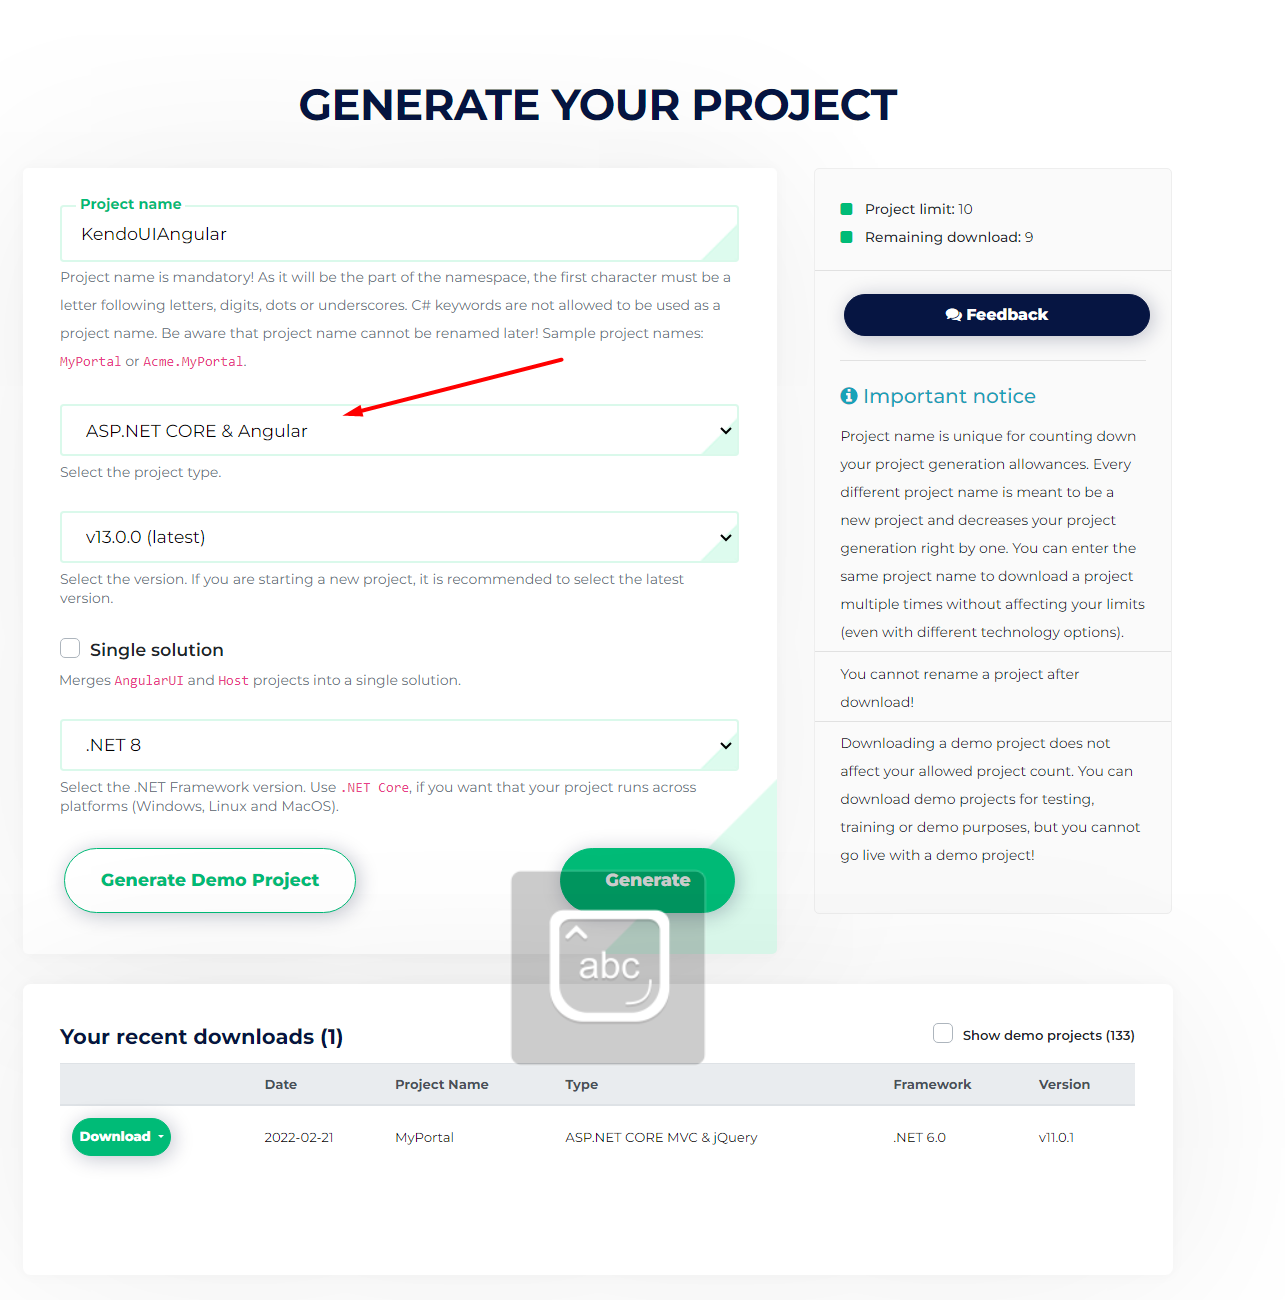
Then, follow the instructions to create a new project and make sure it runs successfully. https://docs.aspnetzero.com/en/aspnet-core-angular/latest/Getting-Started-Angular
## Install Kendo UI Angular
Let's start by installing a [Calendar](https://www.telerik.com/kendo-angular-ui/components/dateinputs/calendar/) component. Run the following command to install the Kendo UI Angular DateInputs package in the root directory of your Angular app.
```bash
ng add @progress/kendo-angular-dateinputs
ng add @progress/kendo-drawing
ng add @progress/kendo-angular-dialog
```
After the installation, run the following command to creating bundles for the application.
```bash
yarn run create-dynamic-bundles
```
Add the following code to the `app-shared.module.ts` file to import the Kendo UI Angular DateInputs module.
```typescript
import { DateInputsModule } from '@progress/kendo-angular-dateinputs';
@NgModule({
imports: [
.
.
.
.
DateInputsModule,
],
})
```
> Don't forget to activate the Kendo UI Angular license. You can find the instructions [here](https://www.telerik.com/kendo-angular-ui/components/my-license/).
## Simple CRUD Operations with Kendo UI Angular Grid
### Install Kendo UI Angular Grid
Run the following command to install the Kendo UI Angular Grid package.
```bash
ng add @progress/kendo-angular-grid
```
After the installation, run the following command to creating bundles for the application.
```bash
yarn run create-dynamic-bundles
```
Add the following code to the `app-shared.module.ts` file to import the Kendo UI Angular Grid module.
```typescript
import { GridModule } from '@progress/kendo-angular-grid';
@NgModule({
imports: [
.
.
.
.
GridModule,
],
})
```
### Create components for CRUD operations
Let's create a simple CRUD operation using the Kendo UI Angular Grid component.
First, open the `AppPermissions.cs` file and add the following permission.
```csharp
public const string Pages_Administration_KendoUi = "Pages.Administration.KendoUi";
```
Then, open the `AppAuthorizationProvider.cs` file and add the following permission to the `PermissionChecker` class.
```csharp
var administration = pages.CreateChildPermission(AppPermissions.Pages_Administration, L("Administration"));
administration.CreateChildPermission(AppPermissions.Pages_Administration_KendoUi, L("KendoUi"));
```
Then, create a new folder named `kendo-ui-grid` in the `src/app/admin` folder in the Angular app and add the following files.
*kendo-ui-grid.component.ts*
```typescript
import { Component, Injector, OnInit } from '@angular/core';
import { appModuleAnimation } from '@shared/animations/routerTransition';
import { AppComponentBase } from '@shared/common/app-component-base';
@Component({
templateUrl: './kendo-ui-grid.component.html',
animations: [appModuleAnimation()],
})
export class KendoUiGridComponent extends AppComponentBase implements OnInit {
constructor(injector: Injector) {
super(injector);
}
ngOnInit(): void {
}
}
```
*kendo-ui-grid.component.html*
```html
```
*kendo-ui-grid-routing.module.ts*
```typescript
import { NgModule } from '@angular/core';
import { RouterModule, Routes } from '@angular/router';
import { KendoUiGridComponent } from './kendo-ui-grid.component';
const routes: Routes = [
{
path: '',
component: KendoUiGridComponent,
pathMatch: 'full',
},
];
@NgModule({
imports: [RouterModule.forChild(routes)],
exports: [RouterModule],
})
export class KendoUiGridRoutingModule {}
```
*kendo-ui.module.ts*
```typescript
import { NgModule } from '@angular/core';
import { KendoUiGridRoutingModule } from './kendo-ui-grid-routing.module';
import { AdminSharedModule } from '@app/admin/shared/admin-shared.module';
import { AppSharedModule } from '@app/shared/app-shared.module';
import { KendoUiGridComponent } from './kendo-ui-grid.component';
@NgModule({
declarations: [KendoUiGridComponent],
imports: [AppSharedModule, AdminSharedModule, KendoUiGridRoutingModule],
})
export class KendoUiGridModule {}
```
Then, open the `admin-routing.module.ts` file and add the following route.
```typescript
{
path: 'kendo-ui',
loadChildren: () => import('./kendo-ui/kendo-ui.module').then((m) => m.KendoUiGridModule),
data: { permission: 'Pages.Administration.KendoUiGrid' },
},
```
Finally, open the `app-navigation.service.ts` file and add the following menu item.
```typescript
new AppMenuItem(
'Kendo UI CRUD Example',
'Pages.Administration.KendoUiGrid',
'flaticon-calendar',
'/app/admin/kendo-ui-grid'
),
```
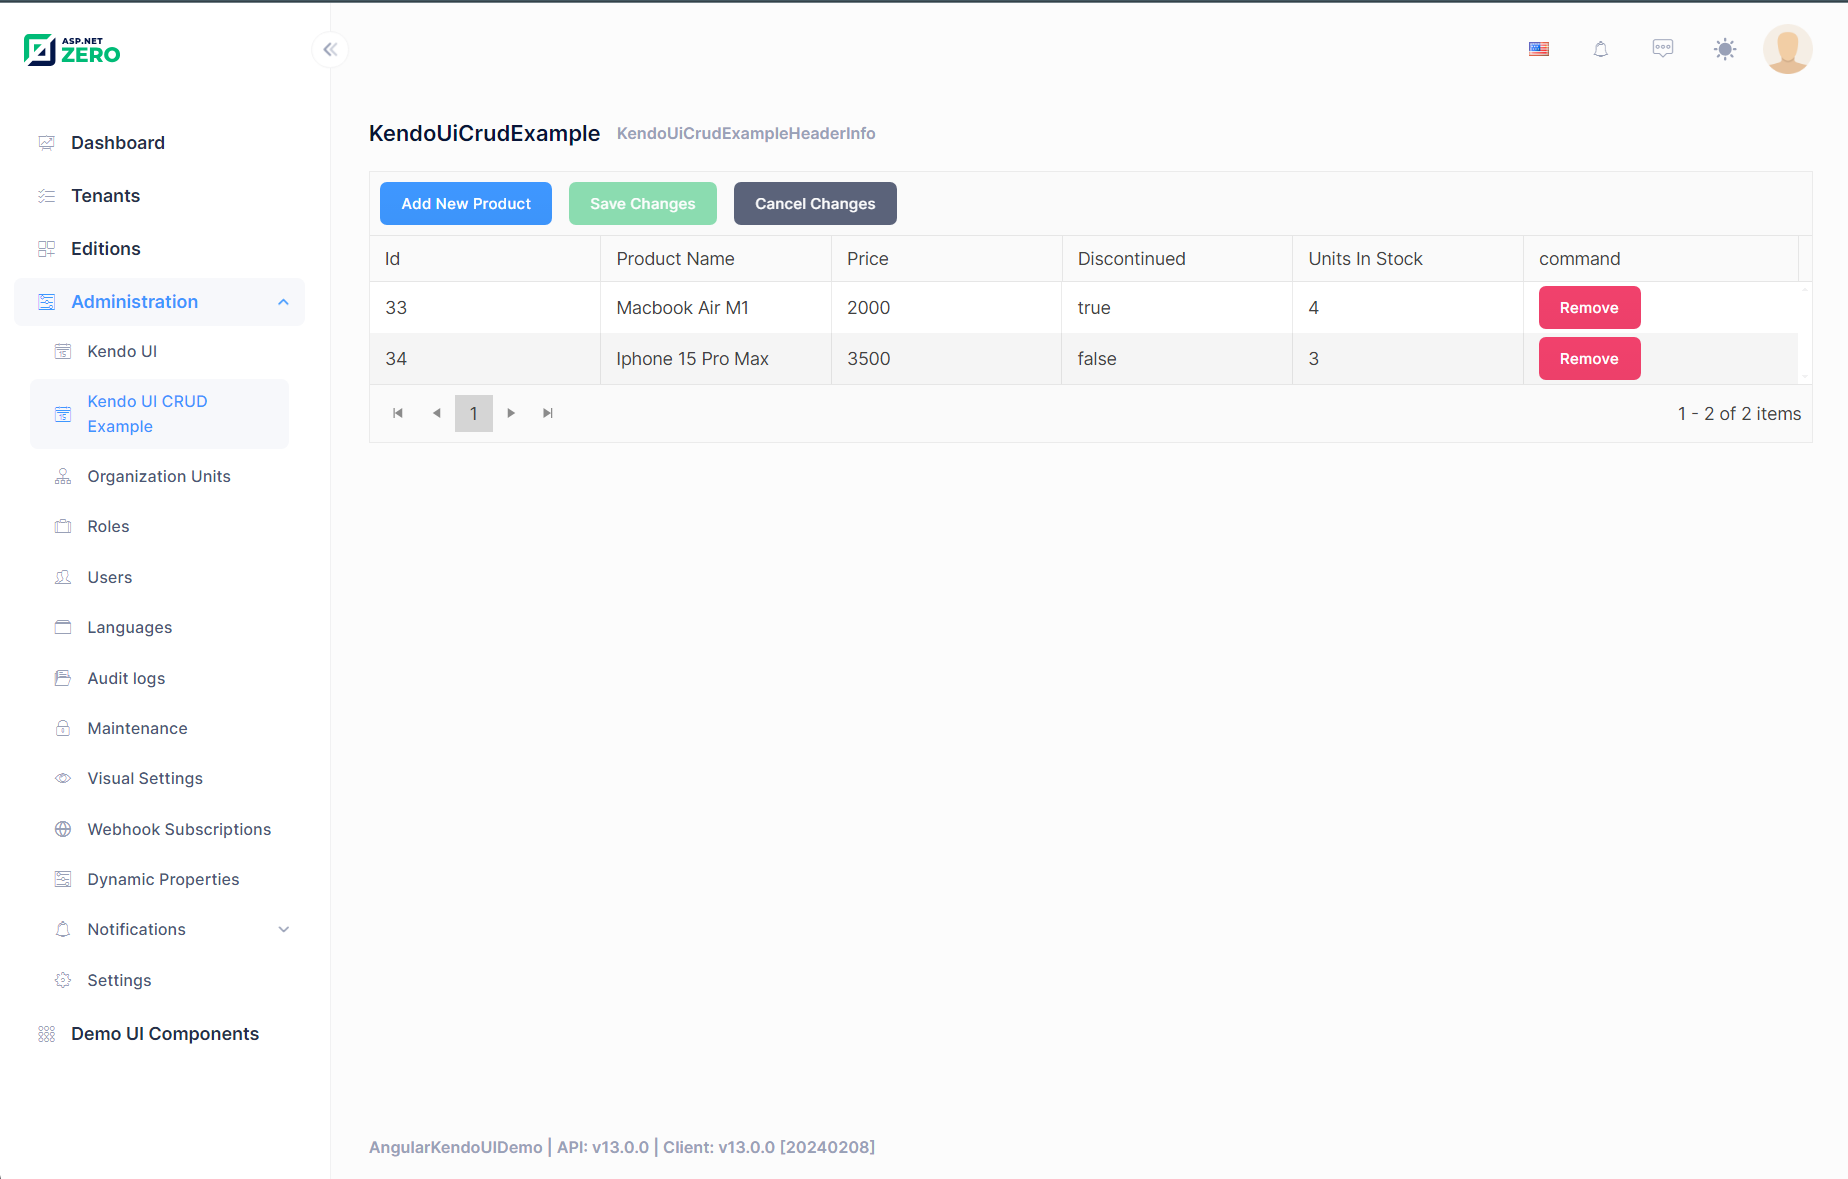
Now, run the application and navigate to the `kendo-ui-grid` page. If you successfully implemented KendoUi, you should see the Kendo UI Angular Grid component.
### Host Part of the Application
Create a new folder named `KendoUi` in the `*.Core` project and add `Product` entity.
```csharp
public class Product : Entity
{
[Required]
public string Name { get; set; }
public int UnitsInStock { get; set; }
public bool Discontinued { get; set; }
[Required]
public decimal UnitPrice { get; set; }
}
```
Add the following code to the `*.DbContext.cs` file to include the `Product` entity.
```csharp
public virtual DbSet Products { get; set; }
```
Create a new folder named `KendoUi` in the `*.Application.Shared` project and add `IProductAppService` and DTOs.
```csharp
using System.Collections.Generic;
using System.Threading.Tasks;
using Abp.Application.Services;
using Abp.Application.Services.Dto;
namespace AngularKendoUIDemo.KendoUi
{
public interface IProductAppService : IApplicationService
{
Task> GetAll(GetAllProductsInput input);
Task CreateOrEditProducts(List inputs);
Task DeleteProducts(List inputs);
}
public class GetAllProductsInput : PagedAndSortedResultRequestDto
{
}
public class ProductListDto : EntityDto
{
public string Name { get; set; }
public int UnitsInStock { get; set; }
public bool Discontinued { get; set; }
public decimal UnitPrice { get; set; }
}
public class CreateOrEditProductInput : EntityDto
{
public string Name { get; set; }
public int UnitsInStock { get; set; }
public bool Discontinued { get; set; }
public decimal UnitPrice { get; set; }
}
}
```
Create a new folder named `KendoUi` in the `*.Application` project and add `ProductAppService`.
```csharp
using System.Collections.Generic;
using System.Linq.Dynamic.Core;
using System.Threading.Tasks;
using Abp.Application.Services.Dto;
using Abp.Domain.Repositories;
using Abp.Linq.Extensions;
using Abp.UI;
using Microsoft.EntityFrameworkCore;
namespace AngularKendoUIDemo.KendoUi;
public class ProductAppService : AngularKendoUIDemoAppServiceBase, IProductAppService
{
private readonly IRepository _productRepository;
public ProductAppService(IRepository productRepository)
{
_productRepository = productRepository;
}
public async Task> GetAll(GetAllProductsInput input)
{
var count = await _productRepository.CountAsync();
var products = await _productRepository
.GetAll()
.OrderBy(input.Sorting ?? "Id")
.PageBy(input)
.ToListAsync();
return new PagedResultDto(count, ObjectMapper.Map>(products));
}
public async Task CreateOrEditProducts(List input)
{
foreach (var item in input)
{
await CreateOrEditProduct(item);
}
}
private async Task CreateOrEditProduct(CreateOrEditProductInput input)
{
if (input.Id == 0)
{
await InsertProduct(input);
}
else
{
await EditProduct(input);
}
}
private async Task InsertProduct(CreateOrEditProductInput input)
{
var product = ObjectMapper.Map(input);
await _productRepository.InsertAsync(product);
}
private async Task EditProduct(CreateOrEditProductInput input)
{
var product = await _productRepository.GetAsync(input.Id);
if (product is null)
{
throw new UserFriendlyException("Product not found");
}
ObjectMapper.Map(input, product);
}
public async Task DeleteProducts(List inputs)
{
foreach (var input in inputs)
{
await DeleteProduct(input);
}
}
private async Task DeleteProduct(EntityDto input)
{
var product = await _productRepository.GetAsync(input.Id);
if (product is null)
{
throw new UserFriendlyException("Product not found");
}
await _productRepository.DeleteAsync(input.Id);
}
}
```
Open CustomDtoMapper.cs file and add the following code to the `CreateMappings` method.
```csharp
configuration.CreateMap();
configuration.CreateMap();
```
### Angular Part of the Application
Now, let's edit the component we created.
*kendo-ui-grid.component.ts*
```typescript
import { Component, Injector, OnInit } from '@angular/core';
import { FormBuilder, FormGroup, Validators } from '@angular/forms';
import {
AddEvent,
CancelEvent,
CellClickEvent,
CellCloseEvent,
DataStateChangeEvent,
GridComponent,
GridDataResult,
RemoveEvent,
SaveEvent,
} from '@progress/kendo-angular-grid';
import { State, process } from '@progress/kendo-data-query';
import { appModuleAnimation } from '@shared/animations/routerTransition';
import { AppComponentBase } from '@shared/common/app-component-base';
import { CreateOrEditProductInput } from '@shared/service-proxies/service-proxies';
import { Observable, map } from 'rxjs';
import { ProductGridService } from './product-grid.service';
import { Keys } from '@progress/kendo-angular-common';
@Component({
templateUrl: './kendo-ui-grid.component.html',
animations: [appModuleAnimation()],
})
export class KendoUiGridComponent extends AppComponentBase implements OnInit {
public gridState: State = {
sort: [],
skip: 0,
take: 5,
};
public changes = {};
public gridData: Observable;
constructor(
injector: Injector,
private _formBuilder: FormBuilder,
public productGridService: ProductGridService,
) {
super(injector);
}
ngOnInit(): void {
this.getProductData(this.gridState);
}
public onStateChange(state: DataStateChangeEvent): void {
this.gridState = state;
this.getProductData(this.gridState);
}
public cellClickHandler(args: CellClickEvent): void {
if (!args.isEdited) {
args.sender.editCell(args.rowIndex, args.columnIndex, this.createFormGroup(args.dataItem));
}
}
public cellCloseHandler(args: CellCloseEvent): void {
const { formGroup, dataItem } = args;
if (!formGroup.valid) {
// prevent closing the edited cell if there are invalid values.
args.preventDefault();
} else if (formGroup.dirty) {
if (args.originalEvent && args.originalEvent.keyCode === Keys.Escape) {
return;
}
this.productGridService.assignValues(dataItem, formGroup.value);
this.productGridService.update(dataItem);
}
}
public addHandler(args: AddEvent): void {
args.sender.addRow(
this.createFormGroup({
discontinued: false,
} as CreateOrEditProductInput),
);
}
public cancelHandler(args: CancelEvent): void {
args.sender.closeRow(args.rowIndex);
}
public saveHandler(args: SaveEvent): void {
if (args.formGroup.valid) {
this.productGridService.create(args.formGroup.value);
args.sender.closeRow(args.rowIndex);
}
}
public removeHandler(args: RemoveEvent): void {
this.productGridService.remove(args.dataItem);
args.sender.cancelCell();
}
public saveChanges(grid: GridComponent): void {
grid.closeCell();
grid.cancelCell();
this.productGridService.saveChanges().subscribe(() => {
this.gridData = this.productGridService.read(this.gridState);
});
}
public cancelChanges(grid: GridComponent): void {
grid.cancelCell();
this.productGridService.cancelChanges();
}
public createFormGroup(dataItem: CreateOrEditProductInput): FormGroup {
return this._formBuilder.group({
id: dataItem.id,
name: [dataItem.name, Validators.required],
unitPrice: dataItem.unitPrice,
unitsInStock: [
dataItem.unitsInStock,
Validators.compose([Validators.required, Validators.pattern('^[0-9]{1,3}')]),
],
discontinued: dataItem.discontinued,
});
}
private getProductData(state: State): void {
this.gridData = this.productGridService.read(state);
}
}
```
Create a service for communication between the component and the backend. *product-grid.service.ts*
```typescript
import { Injectable } from '@angular/core';
import { of, Observable, zip, map } from 'rxjs';
import { CreateOrEditProductInput, ProductServiceProxy } from '@shared/service-proxies/service-proxies';
import { State } from '@progress/kendo-data-query';
import { GridDataResult } from '@progress/kendo-angular-grid';
const itemIndex = (item: CreateOrEditProductInput, data: CreateOrEditProductInput[]): number => {
for (let idx = 0; idx < data.length; idx++) {
if (data[idx].id === item.id) {
return idx;
}
}
return -1;
};
const cloneData = (data: CreateOrEditProductInput[]) => data.map((item) => Object.assign({}, item));
@Injectable()
export class ProductGridService {
private dataResult: GridDataResult;
private originalData: CreateOrEditProductInput[] = [];
private createdItems: CreateOrEditProductInput[] = [];
private updatedItems: CreateOrEditProductInput[] = [];
private deletedItems: CreateOrEditProductInput[] = [];
constructor(private productService: ProductServiceProxy) {}
public read(gridState?: State): Observable {
gridState = gridState || { sort: [{field : 'id'}], skip: 0, take: 5 };
if (this.dataResult && this.dataResult.data.length && !gridState) {
return of(this.dataResult);
}
return this.productService.getAll(gridState.sort.toString(), gridState.skip, gridState.take).pipe(
map((result) => {
this.dataResult = {
data: result.items,
total: result.totalCount,
};
this.originalData = cloneData(result.items);
return this.dataResult;
}),
);
}
public create(item: CreateOrEditProductInput): void {
this.createdItems.push(item);
this.dataResult.data.unshift(item);
}
public update(item: CreateOrEditProductInput): void {
if (!this.isNew(item)) {
const index = itemIndex(item, this.updatedItems);
if (index !== -1) {
this.updatedItems.splice(index, 1, item);
} else {
this.updatedItems.push(item);
}
} else {
const index = this.createdItems.indexOf(item);
this.createdItems.splice(index, 1, item);
}
}
public remove(item: CreateOrEditProductInput): void {
let index = itemIndex(item, this.dataResult.data);
this.dataResult.data.splice(index, 1);
index = itemIndex(item, this.createdItems);
if (index >= 0) {
this.createdItems.splice(index, 1);
} else {
this.deletedItems.push(item);
}
index = itemIndex(item, this.updatedItems);
if (index >= 0) {
this.updatedItems.splice(index, 1);
}
}
public isNew(item: CreateOrEditProductInput): boolean {
return !item.id;
}
public hasChanges(): boolean {
return Boolean(this.deletedItems.length || this.updatedItems.length || this.createdItems.length);
}
public saveChanges(): Observable {
if (!this.hasChanges()) {
return;
}
const completed = [];
if (this.deletedItems.length) {
completed.push(this.productService.deleteProducts(this.deletedItems));
}
if (this.updatedItems.length) {
completed.push(this.productService.createOrEditProducts(this.updatedItems));
}
if (this.createdItems.length) {
completed.push(
this.productService.createOrEditProducts(
this.createdItems.map((item) => {
item.id = 0;
return item;
}),
),
);
}
this.reset();
return zip(...completed);
}
public cancelChanges(): void {
this.reset();
this.dataResult.data = this.originalData;
this.originalData = cloneData(this.originalData);
}
public assignValues(target: CreateOrEditProductInput, source: CreateOrEditProductInput): void {
Object.assign(target, source);
}
private reset() {
this.deletedItems = [];
this.updatedItems = [];
this.createdItems = [];
}
}
```
Open the `kendo-ui-grid.module.ts` file and add `ProductGridService` to the `providers` array.
```typescript
@NgModule({
.
.
.
providers: [ProductGridService],
})
export class KendoUiGridModule {}
```
Add the following code to the `kendo-ui-grid.component.html` file to display the Kendo UI Angular Grid component.
```html
```
Finally, run the application and navigate to the `kendo-ui-grid` page. If you successfully implemented KendoUi, you should see the Kendo UI Angular Grid component with CRUD operations.
## See the full documentation
Explore detailed guides, API references, and step-by-step tutorials for ASP.NET Zero.
[Browse documentation](https://aspnetzero.com/documents)
## Have questions before purchasing?
Schedule a free consultation with our team to find the right plan for your project.
[Schedule a meeting](https://aspnetzero.com/schedule-meeting)
## You might also like
### [Business Benefits of Using ASP.NET Zero for Enterprise Software Development](https://aspnetzero.com/blog/business-benefits-of-aspnetzero)
11 September 2026
### [Common Mistakes and Errors When Hosting ASP.NET Core Apps](https://aspnetzero.com/blog/common-mistakes-and-errors-hosting-aspnet-core-apps)
26 August 2026
### [Using AutoMapper After Migrating to Mapperly](https://aspnetzero.com/blog/using-automapper-after-migrating-to-mapperly)
04 August 2026
## Recent posts
### [Business Benefits of Using ASP.NET Zero for Enterprise Software Development](https://aspnetzero.com/blog/business-benefits-of-aspnetzero)
11 September 2026
### [Common Mistakes and Errors When Hosting ASP.NET Core Apps](https://aspnetzero.com/blog/common-mistakes-and-errors-hosting-aspnet-core-apps)
26 August 2026
### [Using AutoMapper After Migrating to Mapperly](https://aspnetzero.com/blog/using-automapper-after-migrating-to-mapperly)
04 August 2026
## Start building with ASP.NET Zero
Full source code, premium support, Angular, React & MVC UI options.
[View pricing](https://aspnetzero.com/pricing)
## Topics